참고 : https://github.com/nextauthjs/next-auth/issues/9504#issuecomment-2326123445


[BEFORE]

layout.tsx 

import Footer from "@/components/footer";
import Header from "@/components/header";
import ReactQueryProvider from "@/components/provider/ReactQueryProvider";
import type { Metadata } from "next";
import { SessionProvider } from "next-auth/react";
import localFont from "next/font/local";
import { ToastContainer } from "react-toastify";
import "./globals.scss";

import "react-toastify/dist/ReactToastify.css";

const pretendard = localFont({
  src: "./fonts/PretendardVariable.woff2",
  display: "swap",
  weight: "45 920",
  variable: "--font-pretendard",
});

export const metadata: Metadata = {
  title: "Create Next App",
  description: "Generated by create next app",
};

export default function RootLayout({
  children,
}: Readonly<{
  children: React.ReactNode;
}>) {
  return (
    <html lang="kr">
      <body className={`${pretendard.variable} font-pretendard antialiased`}>
        <ReactQueryProvider>
          <SessionProvider>
            <div id="modal-root" />
            <ToastContainer />
            <Header />
            {children}
            <Footer />
          </SessionProvider>
        </ReactQueryProvider>
      </body>
    </html>
  );
}


[AFTER]

layout.tsx

import Footer from "@/components/footer";
import Header from "@/components/header";
import ReactQueryProvider from "@/components/provider/ReactQueryProvider";
import type { Metadata } from "next";
import localFont from "next/font/local";
import { ToastContainer } from "react-toastify";
import "./globals.scss";

import { auth } from "@/auth";
import AuthSessionProvider from "@/components/provider/AuthSessionProvider";
import "react-toastify/dist/ReactToastify.css";

const pretendard = localFont({
  src: "./fonts/PretendardVariable.woff2",
  display: "swap",
  weight: "45 920",
  variable: "--font-pretendard",
});

export const metadata: Metadata = {
  title: "Create Next App",
  description: "Generated by create next app",
};

export default async function RootLayout({
  children,
}: Readonly<{
  children: React.ReactNode;
}>) {
  const session = await auth();
  const sessionKey = new Date().valueOf();

  return (
    <html lang="kr">
      <body className={`${pretendard.variable} font-pretendard antialiased`}>
        <ReactQueryProvider>
          <AuthSessionProvider session={session} sessionKey={sessionKey}>
            <div id="modal-root" />
            <ToastContainer />
            <Header />
            {children}
            <Footer />
          </AuthSessionProvider>
        </ReactQueryProvider>
      </body>
    </html>
  );
}


provider/AuthSessionProvider 프로바이더 컴포넌트를 생성

// AuthSessionProvider.tsx
"use client";

import { SessionProvider } from "next-auth/react";
import { useMemo } from "react";

export default function AuthSessionProvider({ children, ...props }: any) {
  const { session, sessionKey } = props;
  const memoizedSessionKey = useMemo(() => {
    return sessionKey;
  }, [session]);

  return (
    <SessionProvider key={memoizedSessionKey} session={session}>
      {children}
    </SessionProvider>
  );
}


signIn 성공 후 메인 페이지로 리다이렉트 되었을때, 

클라이언트 컴포넌트에서 useSession() 으로 호출하는 session 데이터나,

서버 컴포넌트에서 auth() / getSession() 등으로 호출하는 session 데이터 모두 바로 authorized 상태와 유저 정보가 업데이트 된다

USECASE : 대만 ECPAY 편의점 픽업 지점 선택을 위한 Request the e-map of convenience store(B2C/C2C)


[ECPAY 개발문서]


문서에 명시되어 있다시피,

HTTPS Transfer Protocol

HTTP Method:POST
Accept:text/html
Content Type:application/x-www-form-urlencoded


form 형태로, POST 로 게다가 <html> 텍스트로 데이터를 요청/응답 받아야한다.


프론트에서 Request 파라미터를 말아서 form 으로 보내고, 

Request 파라미터 중 하나인 "ServerReplyURL" 키에 어떤 값을 담아 보내야 하는지가 고민이었다.


왜냐하면, ServerReplyURL 이 url 은, 편의점을 선택하는 ecpay.map 화면으로 url 이 이동 되었다가, 

유저가 편의점 선택을 완료하여 제출하고 나서

1. 다시 돌아올 mysite 페이지

2. POST 로 쏴주는 응답 데이터를 받을 엔드 포인트 


이 두가지 역할을 해야하기 때문이다.


하지만, Next.js 를 사용하고 있어서, 프론트에서도 POST 요청을 받을 수 있는 엔드포인트를 만들 수 있다.


1. app 밑에 api 라우트 파일 생성

/app/api/checkout/cvs-result/route.ts 

import { NextResponse } from "next/server";

// ECPAY 편의점 선택 결과 리턴 엔드 포인트
export async function POST(request: Request) {
  const url = new URL(request.url);

  const body = await request.text();
  return NextResponse.redirect(`https://mysite.com/checkout?${body}`);
}


2. 편의점 선택 컴포넌트 생성

/components/SelectConvenience.tsx


SelectConvenience 컴포넌트는, 편의점 종류를 버튼으로 제공하고,

특정 편의점 버튼을 눌러서 선택하면,

ecpay 에 지점 선택을 위한 map 페이지를 요청하는 컴포넌트 이다.


편의점 종류 선택지 버튼을 UI 로 제공하고,

form 을 숨겨서 submit 할 수 있도록 하였다.


ECPAY 로 보내는 request parameter 에

필수 파라미터 정보를 세팅하고,

ServerReplyUrl = "https://mysite.com/api/checkout/cvs-result" 로 뚫어 놓은 API 주소를 세팅한다

export default function SelectConvenience() {
  const [selectedConvenience, setSelectedConvenience] = useState(pickUpInfo?.selectedConvenience ?? "");

  const onSelectCvs = (cvsType: string) => {
    setSelectedConvenience(cvsType);
    setTimeout(() => {
      const formElement = document.getElementById("cvsForm") as HTMLFormElement;
      if (formElement) formElement?.submit();
    }, 0);
  };

  return (
    <>
      <div className="flex gap-[12px] mobile:flex-col">
        <button onClick={() => onSelectCvs("UNIMARTC2C")}>
          Seven Eleven
        </button>
        <button onClick={() => onSelectCvs("FAMIC2C")}>
          Family Mart
        </button>
      </div>

      <form
        action="https://logistics.ecpay.com.tw/Express/map"
        method="POST"
        encType="application/x-www-form-urlencoded"
        id="cvsForm"
      >
        <input type="hidden" name="MerchantID" value={process.env.NEXT_PUBLIC_MERCHANT_ID ?? ""} />
        <input type="hidden" name="LogisticsType" value="CVS" />
        <input type="hidden" name="LogisticsSubType" value={selectedConvenience} />
        <input type="hidden" name="IsCollection" value="N" />
        <input type="hidden" name="MerchantTradeNo" value='20241023094324' />
        <input
          type="hidden"
          name="ServerReplyURL"
          value={`https://mysite.com/api/checkout/cvs-result`}
        />
      </form>
    </>
  );
}


3. 요청 form을 전송

편의점 종류 버튼을 누르면, 숨겨져있던 form 이 제출되면서, mysite.com 이었던 화면이 ecpay map 화면으로 url 이 이동된다.


ecpay 가 제공하는 Map 사이트로 이동되어 유저는 특정 지점을 선택할 수 있다


4. ecpay 에서 제공하는 site 에서 유저가 편의점을 선택하고 완료를 누르면,

ecpay 는 ServerReplyURL 파라미터 값으로 받은 url 로 formData 형식으로 응답값을 POST 로 쏜다.

이로 인해서, 유저 브라우저 화면은 "https://mysite.com/api/checkout/cvs-result" 로 이동

하지만, 프론트에는 해당 페이지가 없음!

페이지는 없고, api 라우트만 존재!


화면상에는 페이지 없음이 뜨고, 

뚫어 놓은 api POST 라우트로 응답 데이터가 들어온다.


5. 이 데이터를 쿼리 파라미터로 말아서, 다시 원래 화면으로 리다이렉트 시킨다

1번에서 만들어 둔 route 에서 다음과 같이 redirect 를 시킨다

return NextResponse.redirect(`https://mysite.com/checkout?${body}`);


ECPAY 가 리턴 시킨 "https://mysite.com/api/checkout/cvs-result" 로는 잠시 이동했지만, 

바로 Next 의 /api/checkout/cvs-result 라우트에서 페이지를 리다이렉트 시키기 때문에,

육안으로 감지 할 수 없는, 페이지 이동이 발생한다


6. 유저 화면의 Url 이 변경된다!


Next 에서 api 라우트를 제공하면서, CORS 이슈로 백엔드 서버에서 일일히 API 를 따로 만들어 주어야 했던 것들을 
바로 프론트에서 진행 할 수 있게 된 것들이 많다.
서드파티 API 에서 응답을 POST 로 던져주더라도, 프론트로 바로 받을 수 이뜸!!!!!

목표 : 출발지 주소 ~ 목적지 주소 사이의 거리 구하기


이슈 : 클라이언트 사이드에서 fetch 요청을 하면, CORS 에러가 발생

클라이언트 사이드에서 fetch 요청을 하는 경우 참고 코드


How to Use Google Maps Distance Matrix API in React.js

React.js is a popular JavaScript library for building user interfaces, and integrating Google Maps services can add powerful location-based…

medium.com


원인 : distancematrix API 는 서버사이드에서 요청을 해야한다

반면에 geocode API 는 클라이언트 사이드에서 요청을 해도 잘만 나온다


Geocoding API 사용 코드

// Google Maps API를 사용하여 Reverse Geocoding을 통해 장소 이름 가져오기
  const response = await axios.get("https://maps.googleapis.com/maps/api/geocode/json", {
    params: {
      latlng: `${latitude},${longitude}`,
      key: `${process.env.NEXT_PUBLIC_GOOGLE_MAP_API_KEY}`,
    },
  });


 => 정상적인 응답을 잘 받아온다 


Distance Matrix API 사용 코드

const response = await axios.get("https://maps.googleapis.com/maps/api/distancematrix/json", {
      params: {
        origins: origin,
        destinations: destination,
        mode: "transit",
        key: `${process.env.NEXT_PUBLIC_GOOGLE_MAP_API_KEY}`,
      },
    });


=> CORS 에러 발생한다


관련 내용 참고


CORS error · Issue #59 · googlemaps/google-maps-services-js

CORS error with a distancematrix request. But geocoder request works fine. What am I missing? Fetch API cannot load https://maps.googleapis.com/maps/api/distancematrix/json?destinations=New%2…%20La...

github.com


따봉 많이 받으신 분의 코멘트 요약해보면, API 문서에 어디에도 서버사이드에서만 작동한다는 말이 없는데, distancematrix 는 서버사이드로 요청해야한다고 해서 트러블 슈팅에 시간을 많이 소요했다. 결론은 클라이언트 사이드에서 distance matrix 를 구하려면 Javascript API 를 사용해야한다.


해결방안 : Next.js 의 api/route 를 사용

브라우저에서 바로 요청하지 않고, Next 서버에서 요청 후 응답을 리턴하는 거로 변경


1. /app/api/googlemaps/route.ts 파일생성

import { NextResponse } from "next/server";
import axios from "axios";

export async function GET(request: Request) {
  const url = new URL(request.url);
  const origins = url.searchParams.get("origins");
  const destinations = url.searchParams.get("destinations");

  try {
    const response = await axios.get("https://maps.googleapis.com/maps/api/distancematrix/json", {
      params: {
        origins: `${origins}`,
        destinations: `${destinations}`,
        mode: "transit",
        key: {YOUR_API_KEY},
      },
    });
    
    return NextResponse.json({ distance: response?.data?.rows[0]?.elements[0]?.distance?.text || "" });
  } catch (error) {
    console.error("Failed to fetch distance:", error);
    return NextResponse.json({ distance: "Unknwon distance" });
  }
}


2. 컴포넌트 단에서 Next 서버로 fetch 요청

const origins = "서울특별시 강남구 선릉로 551";
const destinations = store.address

const result = await fetch(`/api/googlemaps?origins=${origins}&destinations=${destinations}`);
const data = await result.json();

console.log('distance', data.distance)


CORS 해결...!


SSR 용 Fetch 인스턴스


구현 내용

  1. https://mypage.com/kr/ko" 와 같이, /[country]/[language] 정보를 url params 로 제공한다.
  2. 상품 디테일 페이지를 서버사이드 랜더링으로 제공한다.
  3. 상품 디테일 정보는 국가/언어 에 따라 달라진다.
  4. 국가/언어 정보를 HTTP 요청 헤더에 Country, Language 를 키값으로 전달한다.
  5. 상품 "좋아요"/"위시리스트" 등과 같은 유저 데이터를 제공하여야한다.
  6. 게스트는 쿠키의 "DJSESSION" 값 으로 유저 데이터를 제공한다 -> Cookie 를 헤더에 담아서 전송


코드

"use server";

import { cookies } from "next/headers";
import { getServerSession } from "next-auth";

import { CustomError } from "./customError";

interface FetchOptions extends RequestInit {
  headers?: HeadersInit;
}

const serverFetch = async (url: string, country: string, lang: string): Promise<Response | undefined> => {
  const headers: HeadersInit = {
    "Content-Type": "application/json",
    Country: country || "us",
    Language: lang || "en",
    Cookie: cookies().toString(), // DJSESSION SSR
  };

  const fetchOptions: FetchOptions = {
    headers,
    credentials: "include",
  };

  try {
    const response = await fetch(`${process.env.NEXT_PUBLIC_API_URL}${url}`, fetchOptions);

    if (response.status === 500) {
      throw new CustomError(`Undefined Error ${response.statusText}`, response.status);
    }

    if (response.status >= 400) {
      const errorData = await response.json();
      const error = new CustomError(errorData.message, errorData.status);
      throw error; // catch 로 빠짐
    }

    return response;
  } catch (error) {
    // Promise 자체가 rejected (network error, CORS 등)
    throw error;
  }
};

export { serverFetch };


Page 코드

app/[country]/[lang]/item/[id]/page.tsx

import Pdp from "@/components/pages/Pdp";
import { getProductWithSSR } from "@/shared/queries/pdp";

interface Params {
  params: {
    country: string;
    lang: string;
    sku: string;
  };
}

export default async function DetailPage({ params }: Params) {
  const { country, lang, sku } = params;

  // SSR - Country / Lang 전달
  const productDetail = await getProductWithSSR({ sku, country, lang });

  return (
    <section>
      <Pdp productDetail={productDetail} />
    </section>
  );
}


Query 코드

export const getProductWithSSR = ({ sku, country, lang }: PropductProps) =>
  serverFetch(`/service/catalog/product/${sku}`, country, lang)
    .then((response) => response?.json())
    .then((data) => data.data);


Description

1. page 에서 params 를 통해서 country / language 정보를 얻고, 이를 getProductWithSSR 쿼리 함수에 전달한다


1. 현재 프로젝트 구성

Next.js App router 사용

Typescript

Eslint 


2. 테스트 툴 선택

Jest 와 Testing Library 를 사용하기로 결정


3. 세팅

1) Testing Libray React 패키지 설치

(참고 : Installation - With Typescript)

npm install --save-dev @testing-library/react @testing-library/dom @types/react @types/react-dom


2) Jest (React) 패키지 설치

(참고: Testing React Apps - Setup With Create React App)

npm install --save-dev jest react-test-renderer


(참고: Next.js JEST- Manual Setup)

npm install -D jest-environment-jsdom @testing-library/jest-dom


3) Typescript 용 추가 패키지 설치

npm i --save-dev @types/jest ts-jest


4) Eslint 용 추가 패키지 설치

npm i -D eslint-plugin-jest


5) 테스트 스크립트 추가

✅ 설치 후 package.json

"scripts": {
    "test": "jest"
},

"dependencies": {
    "react": "^18",
    "react-dom": "^18",
},

"devDependencies": {
    "@testing-library/dom": "^10.1.0",
    "@testing-library/jest-dom": "^6.4.6",
    "@testing-library/react": "^16.0.0",

    "@types/jest": "^29.5.12",
    "@types/react": "^18.3.3",
    "@types/react-dom": "^18.3.0",

    "jest": "^29.7.0",
    "jest-environment-jsdom": "^29.7.0",
    "react-test-renderer": "^18.3.1",

    "eslint-plugin-jest": "^28.6.0",

    "ts-jest": "^29.1.5",
}


6) tsconfig.json 에 types 추가

  "compilerOptions": {
    "types": ["node", "jest", "@testing-library/jest-dom"],


7) jest init 으로 기본 config 세팅

npm init jest@latest


✅ jset.config.ts 파일 확인

Next.js Jest config 사용하여 수정 (참고

/**
 * For a detailed explanation regarding each configuration property, visit:
 * https://jestjs.io/docs/configuration
 */

import type { Config } from "jest";
import nextJest from "next/jest.js";

const createJestConfig = nextJest({
  // Provide the path to your Next.js app to load next.config.js and .env files in your test environment
  dir: "./",
});

const config: Config = {
  // Automatically clear mock calls, instances, contexts and results before every test
  clearMocks: true,
 
  // An array of file extensions your modules use
  moduleFileExtensions: ["js", "mjs", "cjs", "jsx", "ts", "tsx", "json", "node"],

  // A preset that is used as a base for Jest's configuration
  preset: "ts-jest",

  // The test environment that will be used for testing
  testEnvironment: "jsdom",
};

export default createJestConfig(config);


8) .eslintrc.json에 설정 추가 (기존설정에 jest 관련 설정 추가)

"plugins": ["jsx-a11y", "@typescript-eslint", "prettier", "jest"],

"env": {
    // 전역객체를 eslint가 인식하는 구간
    "browser": true, // document나 window 인식되게 함
    "node": true,
    "es6": true,
    "jest/globals": true
},

"ignorePatterns": [
    "node_modules/",
    ".eslintrc.js",
    "next.config.js",
    "postcss.config.js",
    "run_server.js",
    "jest.config.ts"
], // eslint 미적용될 폴더나 파일 명시


4. 예제 코드 작성

(참고 - Jest Dom Testing)


Jest 페이지에서 제공하는 CheckboxWithLabel.js 컴포넌트를 만들고, 테스트 코드를 작성

typescript 버전으로 작성


1) CheckboxWithLabel.tsx

import { useState } from "react";

export default function CheckboxWithLabel({ labelOn, labelOff }: { labelOn: string; labelOff: string }) {
  const [isChecked, setIsChecked] = useState(false);

  const onChange = () => {
    setIsChecked(!isChecked);
  };

  return (
    <label>
      <input type="checkbox" checked={isChecked} onChange={onChange} />
      {isChecked ? labelOn : labelOff}
    </label>
  );
}


2) 프로젝트 루트에 __tests__/CheckboxWithLabel.test.tsx

import { cleanup, fireEvent, render } from "@testing-library/react";

import CheckboxWithLabel from "@/components/ui/CheckboxWithLabel";

// Note: running cleanup afterEach is done automatically for you in @testing-library/react@9.0.0 or higher
// unmount and cleanup DOM after the test is finished.
afterEach(cleanup);

it("CheckboxWithLabel changes the text after click", () => {
  const { queryByLabelText, getByLabelText } = render(<CheckboxWithLabel labelOn="On" labelOff="Off" />);

  expect(queryByLabelText(/off/i)).toBeTruthy();

  fireEvent.click(getByLabelText(/off/i));

  expect(queryByLabelText(/on/i)).toBeTruthy();
});


3) 테스트 실행

npm run test


5. 실제 내가 원하는 테스트 내용

  • url 로 다국가 처리중 : /{country}/{language} 👉 /kr/ko, /us/en, /ch/zh, /tw/zh, /jp/ja... 
  • 국가별로 지원하는 서비스가 다름 
    • kr : 주소로 배달, 매장 픽업
    • us : 주소로 배달, 매장 픽업
    • tw : 주소로 배달, 매장 픽업, 편의점 픽업
    • jp : 주소로 배달
  • next-intl 을 사용하여 다국어 처리를 하고 있음
    • /locales/ko/common.json 파일 안에 key-value 값으로 관리
  • <ShippingOptions> 라는 컴포넌트는 국가에 맞게, 필요한 버튼을 노출시켜주는 컴포넌트

TODO 👉 테스트 내용 : url 로 국가가 변경될 때마다 적절한 버튼들이 랜더링 되는가


1) ShippingOptions 컴포넌트 코드

import { useParams } from "next/navigation";
import { useEffect } from "react";

import { useCheckoutStore } from "@/shared/libs/stores/checkout";

import ConveniencePickup from "./_function/ConveniencePickup";
import ShipToAddress from "./_function/ShipToAddress";
import StorePickup from "./_function/StorePickup";

export default function ShippingOptions() {
  const { country } = useParams();

  const { updateShippingOption } = useCheckoutStore();

  useEffect(() => {
    if (!["kr", "us", "tw"].includes(country as string)) {
      updateShippingOption("shipToAddress");
    }
  }, [country]);

  if (["kr", "us"].includes(country as string))
    // 스토어 픽업 지원 국가
    return (
      <div className="flex gap-[8px] mb-[24px]">
        <ShipToAddress />
        <StorePickup />
      </div>
    );

  if (country === "tw")
    // 스토어 픽업 & 편의점 픽업 지원 국가
    return (
      <div className="flex gap-[8px] flex-col">
        <ShipToAddress />
        <StorePickup />
        <ConveniencePickup />
      </div>
    );
  return (
    <div className="mb-[24px]">
      <ShipToAddress />
    </div>
  );
}


2) /__tests__/ShippingOptions.test 테스트 코드

/* eslint-disable import/no-dynamic-require */
/* eslint-disable global-require */
import "@testing-library/jest-dom";
import { render } from "@testing-library/react";
import { useParams } from "next/navigation";
import { NextIntlProvider } from "next-intl";

import ShippingOptions from "@/components/pages/Checkout/ShippingStep/ShippingOptions";

// Mock useParams from next/navigation
jest.mock("next/navigation", () => ({
  useParams: jest.fn(),
}));

describe("ShippingOptions", () => {
  const useRouter = jest.spyOn(require("next/router"), "useRouter");
  const locale = "ko";
  const messages = require(`../locales/${locale}/common.json`);

  useRouter.mockImplementationOnce(() => ({
    query: { locale },
  }));

  it("kr 은 2가지 shipping option 을 리턴한다 (배송지 주소 / 매장에서 픽업)", () => {
    (useParams as jest.Mock).mockReturnValue({ country: "kr" });
    const { debug } = render(
      <NextIntlProvider messages={messages} locale={locale}>
        <ShippingOptions />
      </NextIntlProvider>,
    );

    // expect(getByText("배송지 주소")).toBeInTheDocument();
    // expect(getByText("매장에서 픽업")).toBeInTheDocument();
    debug();
  });

  it("jp 은 1가지 shipping option 을 리턴한다 (배송지 주소)", () => {
    (useParams as jest.Mock).mockReturnValue({ country: "jp" });
    const { getByText } = render(
      <NextIntlProvider messages={messages} locale={locale}>
        <ShippingOptions />
      </NextIntlProvider>,
    );

    expect(getByText("배송지 주소")).toBeInTheDocument();
  });

  it("tw 은 3가지 shipping option 을 리턴한다 (배송지 주소 / 매장에서 픽업 / 편의점에서 픽업)", () => {
    (useParams as jest.Mock).mockReturnValue({ country: "tw" });
    const { getByText } = render(
      <NextIntlProvider messages={messages} locale={locale}>
        <ShippingOptions />
      </NextIntlProvider>,
    );

    expect(getByText("배송지 주소")).toBeInTheDocument();
    expect(getByText("매장에서 픽업")).toBeInTheDocument();
    expect(getByText("편의점에서 픽업")).toBeInTheDocument();
  });
});


3) 테스트 실행

npm run test


4) 테스트 결과

debug() 를 사용하면, 실제 생성되는 html 을 확인 할 수 있다


구현 조건

1. axios 대신 기본 fetch 를 사용

2. Authorization 에 accessToken 을 담아서 보내는 AuthFetch, 그냥 기본 fetch 인스턴스가 필요함

3. 로그인 후 받은 accessToken은 cookie 에 httpOnly 쿠키로 저장 -> js 단에서 가져다 쓸 수 없음

     - httpOnly 쿠키로 저장하지 않으면, next-cookie 의 getCookie() 등으로 자유롭게 가져다 쓸 수 있다.

4. next-auth의 useSession 을 통해서 accessToken 에 접근 가능

     - next-auth 의 useSession 을 통해서 접근할 수 있기 때문에 use** 형태의 훅 내부에 메서드를 사용하는 패턴으로 구현


단계별 구현


1. 기본 fetch 로 Client Side 데이터 fetch

  // 1. 기본 fetch
  useEffect(() => {
    fetch("https://api.coinpaprika.com/v1/coins")
      .then((res) => res.json())
      .then((data) => {
        console.log("data", data);
      });
  }, []);


2. 메서드의 재사용성을 위하여 hook 내부 method 로 구조 변경

1) useCheckout.ts 훅 생성

export const useCheckout = () => {
  
  const getCoins = () => fetch("https://api.coinpaprika.com/v1/coins").then((response) => response.json());

  return { getCoins };
};


2) 컴포넌트에서 메서드 호출

const { getCoins } = useCheckout();

// 2. useCheckout 내부 method 사용
useEffect(() => {
    getCoins().then((data) => {
      console.log("getCoins - data", data);
    });
}, []);


3. accessToken 를 헤더에 함께 보내는 AuthFetcher 사용


1) useFetchWithToken 훅 생성

import { useSession, signIn } from "next-auth/react";

interface FetchOptions extends RequestInit {
  headers?: HeadersInit;
}

export default function useFetchWithToken() {
  const { data: session, status } = useSession();

  const fetchWithToken = async (url: string, options: FetchOptions = {}): Promise<Response | undefined> => {
    if (status === "loading") {
      return;
    }
    if (status === "unauthenticated") {
      console.log("로그인이 필요합니다.");
      return;
    }

    const headers = {
      ...options.headers,
      "Content-Type": "application/json",
      Authorization: `Bearer ${(session?.user as any).accessToken}`,
    };

    try {
      const response = await fetch(`${process.env.NEXT_PUBLIC_CHAT_SERVER_API_URL}${url}`, {
        ...options,
        headers,
      });

      if (response.status === 401) {
        signIn();
      }

      return response;
    } catch (error) {
      console.error("Fetch error:", error);
      // Handle error accordingly
    }
  };

  return fetchWithToken;
}


2) useCheckout 훅에 method 추가 (fetchWithToken 을 사용하는 fetcher 메서드)

export const useCheckout = () => {
  const authFetcher = useFetchWithToken();

  const getCoins = () => fetch("https://api.coinpaprika.com/v1/coins").then((response) => response.json());

  const getAuthCoins = () => authFetcher("https://api.coinpaprika.com/v1/coins").then((response) => response.json());

  return { getCoins, getAuthCoins };
};


3) 컴포넌트 단에서 호출

  // 3. authFetcher 사용
  const { status } = useSession();
  useEffect(() => {
    getAuthCoins().then((data) => {
      console.log("getAuthCoins - data", data);
    });
  }, [status]);


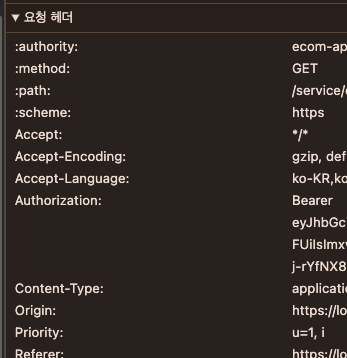
4) 요청 헤더에 Authorization 확인 가능


4. react-query 사용하여 기본 fetch 호출

1번 로직에 react-query 추가

  // 4. useQuery 사용(기본 fetch)
  const { data } = useQuery({
    queryKey: ["test"],
    queryFn: () => fetch("https://api.coinpaprika.com/v1/coins").then((res) => res.json()),
  });
  useEffect(() => {
    console.log("useQuery - data", data);
  }, [data]);


5. react-query 에서 hook 내부 method 호출

2-1 에서 만들어 둔 getCoins 함수를 호출하여 사용

  // 5. useQuery 사용(useCheckout 내부 method 사용)
  const { data } = useQuery({
    queryKey: ["test"],
    queryFn: getCoins,
  });
  useEffect(() => {
    console.log("getCoins - data", data);
  }, [data]);


6. react-query 를 통해서 accessToken 를 헤더에 함께 보내는 AuthFetcher 사용

3-1 에서 만들어둔 useFetchWithToken 훅을 사용

useCheckout.ts

useFetchWithToken.ts 

동일하게 사용


컴포넌트 부분 코드 변경 -> useQuery 키값에 status 를 넣어서 세션의 status 값이 변경될때 재시도 될 수 있도록 함

// 6. useQuery 사용(authFetcher 사용)
  const { status } = useSession();
  const { data } = useQuery({
    queryKey: ["test2", status],
    queryFn: getAuthCoins,
  });

  useEffect(() => {
    console.log("getCoins - data", data);
  }, [data]);


<최종 모습>

1. MyComponent.tsx

import { useSession } from "next-auth/react";
import { useQuery } from "@tanstack/react-query";
import { useCheckout } from "@/shared/queries/checkout";


const { status } = useSession();
const { getAuthCoins } = useCheckout();
  
const { data } = useQuery({
    queryKey: ["test2", status],
    queryFn: getAuthCoins,
});

useEffect(() => {
	console.log("getCoins - data", data);
}, [data]);


2. useCheckout.ts

import useFetchWithToken from "@/hooks/useFetchWithToken";

export const useCheckout = () => {
  const authFetcher = useFetchWithToken();

  const getCoins = () => fetch("https://api.coinpaprika.com/v1/coins").then((response) => response.json());

  const getAuthCoins = () => authFetcher("/service/customers/niceid/oauth/token").then((response) => response.json());

  return { getCoins, getAuthCoins };
};


3. useFetchWithToken.ts

import { useSession, signIn } from "next-auth/react";

interface FetchOptions extends RequestInit {
  headers?: HeadersInit;
}

export default function useFetchWithToken() {
  const { data: session, status } = useSession();

  const fetchWithToken = async (url: string, options: FetchOptions = {}): Promise<Response | undefined> => {
    if (status === "loading") {
      return;
    }
    if (status === "unauthenticated") {
      console.log("로그인이 필요합니다.");
      return;
    }

    const headers = {
      ...options.headers,
      "Content-Type": "application/json",
      Authorization: `Bearer ${(session?.user as any).accessToken}`,
    };

    try {
      const response = await fetch(`${process.env.NEXT_PUBLIC_CHAT_SERVER_API_URL}${url}`, {
        ...options,
        headers,
      });

      if (response.status === 401) {
        signIn();
      }

      return response;
    } catch (error) {
      console.error("Fetch error:", error);
      // Handle error accordingly
    }
  };

  return fetchWithToken;
}

Next.js 프로젝트에서 http서버와 https 서버를 둘다 띄워서 사용하고 있는 상황


세팅 참고 : [Next.js] 로컬(localhost)에 https 적용하기


[Next.js] 로컬(localhost)에 https 적용하기

mkcert라는 프로그램을 이용해서 로컬 환경(내 컴퓨터)에서 신뢰할 수 있는 인증서 만들 수 있다.로컬(내 컴퓨터)을 인증된 발급 기관으로 추가(localhost로 대표되는) 로컬 환경에 대한 인증서를 만

velog.io


크롬에서 브라우저에서 2개의 탭을 열었음


http://localhost:3000


https://localhost:3001


처음에는 https 만 코드 fast refresh 가 적용이 되지 않는 줄 알았다

근데, 코드상에 차이점이 없어서 뭐지 삽질하면서 서버를 내렸다 올렸다, 브라우저를 리프레쉬했다 이랬다 저랬다 하는데, 이번에는 http 브라우저세션이 fast refresh 안됨


행동패턴을 살펴보니, 처음 서버를 올리고 건드린 브라우저에서는 fast refresh 가 되고, 다른건 안됨


=> Next.js 는 최초 사용되는 웹소켓 서버와 바인딩 함

  1. Single WebSocket Connection for HMR:
    • Next.js uses WebSocket connections for HMR to update the browser with changes in real-time.
    • Typically, the WebSocket server binds to a single address and port, usually the same as your HTTP server (e.g., http://localhost:3000).
  • When you run npm run dev, Next.js binds its WebSocket server for HMR to the address used first. If you refresh http://localhost:3000 first, the HMR WebSocket connection will be bound to the HTTP server.
  • Conversely, if you refresh https://localhost:3001 first after starting the server, the HMR WebSocket connection will be bound to the HTTPS server.


[참고 링크]

https://gseok.github.io/tech-talk-2022/2022-01-24-what-is-HMR/


HMR 이해하기

소개 보통 javascript 프로젝트 개발시에, 일반적으로 next.js와 같은 통합 개발 환경을 사용하거나, 직접 개발 환경을 구축 하더라도, webpack-dev-server의 hot 옵션정도를 사용하여서 개발을 하게 된다.

gseok.github.io


작업에 사용될 파일 구조


1. MSW 설치

npm i -D msw@1.3.2


[Usage] npx msw init <PUBLIC_DIR> [options]

npx msw init public


public 폴더 아래 mockServiceWorker.js 파일이 생성된 것을 확인

package.json 에 msw workinDirectory 세팅 된 것을 확인

"msw": {
    "workerDirectory": "public"
  }


2. MSW 구동 세팅

1. fake api/data 세팅

- api/mocks/fake-api/search-api.ts

import { rest } from "msw";

import { validData } from "../fake-data/search-data";

// GET method인 /get-names를 호출하면 다음과 같이 response가 되도록 mocking 정의
const getSearchProducts = () => rest.get("/get-names", (req, res, ctx) => res(ctx.status(200), ctx.json(validData)));

const searchHandlers = [getSearchProducts()];

export default searchHandlers;


- api/mocks/fake-data/search-data.ts

// 검색 결과 있는 경우
export const validData = {
  searchedProducts: [
    {
      id: 0,
      name: "test product 1",
      imgSrc: "test_img.png",
      price: 650,
      stockState: "Out of Stock",
    },
    {
      id: 1,
      name: "test product 2",
      imgSrc: "test_img.png",
      price: 650,
      stockState: "Out of Stock",
    },
    {
      id: 2,
      name: "test product 3",
      imgSrc: "test_img.png",
      price: 650,
      stockState: "Out of Stock",
    },
    {
      id: 3,
      name: "test product 4",
      imgSrc: "test_img.png",
      price: 650,
      stockState: "Out of Stock",
    },
  ],
};


2. 통합 handlers.ts 세팅

- api/mocks/handlers.ts

import searchHandlers from "./fake-api/search-api";

export const handlers = [...Object.values(searchHandlers)];


다른 fake-api 들도 추가되는대로 나열하여 작성


3. browser 에서 API mocking 실행 스크립트 작성

- api/mocks/browser.ts

import { setupWorker } from "msw";

import { handlers } from "./handlers";

export const worker = setupWorker(...handlers);


4. server 에서 API mocking 실행 스크립트 작성

- api/mocks/server.ts

import { setupServer } from "msw/node";

import { handlers } from "./handlers";

export const server = setupServer(...handlers);


5. 초기화 시점에 따라 brower / server 스크립트 실행 

- api/mocks/index.ts

export async function initMSW() {
  if (typeof window === "undefined") {
    const { server } = await import("./server");

    server.listen({
      onUnhandledRequest: "bypass",
    });
  } else {
    const { worker } = await import("./browser");
    worker.start({
      onUnhandledRequest: "bypass",
    });
  }
}


6. 클라이언트 단에서만 mocking 을 하기 위한 MswProvider 컴포넌트 작성

- components/provider/MswProvider.tsx

"use client";

import { useState, type PropsWithChildren, useEffect } from "react";

const isDev = process.env.NODE_ENV === "development";

interface Props {}

export default function MswProvider({ children }: PropsWithChildren<Props>) {
  const [ready, setReady] = useState(false);

  const init = async () => {
    if (isDev) {
      const initMock = await import("@/api/mocks/index");
      await initMock.initMSW();
      setReady(() => true);
    }
  };

  useEffect(() => {
    if (ready) return;
    init();
  }, [ready]);

  if (!isDev) return null;

  return <>{children}</>;
}


- .env 에 NODE_ENV 세팅

NODE_ENV=development


7.  루트 layout 에서 mocking 스크립트 실행

- app/layout.tsx

import MswProvider from "@/components/provider/MswProvider";

export default async function RootLayout({
  children,
  params,
}) {
  return (
    <html lang={lang}>
      <body className={fontClassName}>
        <MswProvider>
          <ReactQueryProvider>
            <NextIntlClientProvider locale={lang} messages={dict}>
              <Header />
              <div id="main-contents">{children}</div>
              <Footer lang={lang} />
            </NextIntlClientProvider>
          </ReactQueryProvider>
        </MswProvider>
      </body>
    </html>
  );
}


8. 실제 api 호출 테스트

- components/searchModal.tsx

  // 검색 API 호출
  const { isLoading, error, data } = useQuery({
    queryKey: ["search", inputValue],
    queryFn: () => getSearchProducts(inputValue),
    enabled: !!inputValue,
  });


- api/search.ts

// GET order summary 가져오기
export const getSearchProducts = async (query: string) => {
  const res = await fetch(`/get-names`);
  const json = await res.json();
  return json;
};


Network 탭에서 데이터 확인


mocking 할 데이터를 수정하는 경우에 브라우저 새로고침 해주어야 함!

에러 케이스

에러가 발생하는 원인 관점에서 두가지 케이스가 있다.

1. 프론트 에러 : 주로 Type Error, 참조 에러 등

2. 백엔드 API 에러 : HTTP 케이스와 웹사이트 로직에 따라서 세부로 나뉨 (Get / Post / Put / Delete .. 등)


처리 방안

1. 프론트 에러

a) axios 요청 전부터 에러 발생 (accessToken 없음) 👉 토큰 없음 메시지 Toast UI 표출 & 로그인 페이지로 이동

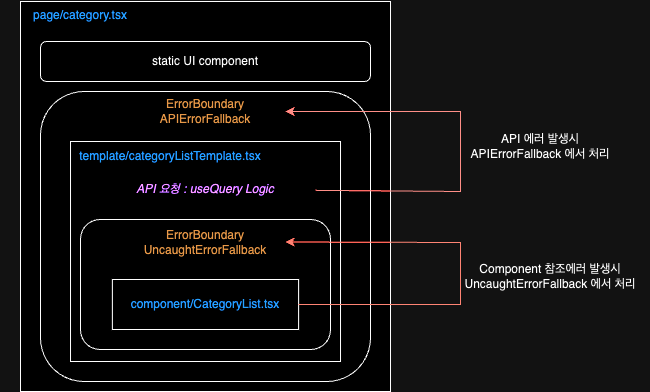
b) 참조에러 👉 발생하는 컴포넌트를 ErrorBoundary 로 감싸고 fallBackComponent 처리 + Uncaught Error 메시지 제공


2. 백엔드 API 에러

a) GET 조회 결과 빈 데이터 👉 에러로 처리하지 않고, 200 성공에 데이터가 없는 경우 보여줄 컴포넌트로 처리

b) GET 조회 결과 에러 👉 에러 코드 & 메시지와 함께 Retry 버튼 제공

c) GET 조회 할 자원이 없는 데이터 👉 404 페이지

d) PUT, DELETE, POST 실패 👉 에러 코드 & 메시지 Toast UI 표출 및 요청 내용 처리 안함, 페이지 유지

e) 401 에러 👉 접근 권한 없음 문구 노출 & 로그인 페이지로 이동 버튼 제공

f) 404 에러 👉 404 페이지

g) 500 에러 👉 500 페이지


코드

(* ErrorBoundary 관련 케이스만)

    • 전체 구조


  • page/category.tsx
    • React-Query 의 useQueryErrorResetBoundary 를 사용하여 error 가 발생한 queryFn 을 재실행 트리거 할 수 있는 reset 함수 제공
export default function Category() {
	const { reset } = useQueryErrorResetBoundary();

	 return (
         <ErrorBoundary
            onReset={reset}
            fallbackRender={({ error, resetErrorBoundary }) => (
              <APIErrorFallback error={error} onClickHandler={resetErrorBoundary} />
            )}
          >
            <CategoryListTemplate/>
          </ErrorBoundary>
      )
  }


  • template/CategoryListTemplate.tsx
export default function CategoryListTemplate({
    const { isLoading, error, data, refetch } = useQuery({
        queryKey: ["category", "list"],
        queryFn: getCategoryList,
        useErrorBoundary: true,
      });

    if (isLoading) return <LoadingSpinner />;

    if (error) throw error; // error boundary 에서 처리

    return (
        <ErrorBoundary FallbackComponent={UncaughtErrorFallback}>
          <CategoryList data={categoryListData} />
        </ErrorBoundary>
    );
}


  • errors/UncaughtErrorFallback.tsx
import { Card } from "react-bootstrap";
import Flex from "../Flex";

export default function UncaughtErrorFallback({ error }) {
  return (
    <div role="alert">
      <Card className="mt-3 bg-light p-4" style={{ boxShadow: "none" }}>
        <Flex direction="column" alignItems="center">
          <h5 className="mb-2">오류가 발생했습니다.</h5>
          <div className="fs--1 mb-3">관리자에게 문의해주세요.</div>
          <pre className="text-danger">[Client 에러] : {error.message}</pre>
        </Flex>
      </Card>
    </div>
  );
}


  • errors/APIErrorFallback.tsx
import { Button, Card } from "react-bootstrap";
import Flex from "../Flex";

export default function APIErrorFallback({ error, onClickHandler }) {
  return (
    <div role="alert">
      <Card className="mt-3 bg-light p-5" style={{ boxShadow: "none" }}>
        <Flex direction="column" alignItems="center">
          <h5 className="mb-2">오류가 발생했습니다.</h5>
          <div className="fs--1">잠시 후 다시 시도해주세요.</div>
          <div className="fs--1 mb-2">동일한 문제가 반복될 경우 관리자에게 문의해주세요</div>
          <pre className="text-danger mb-4">
            API 요청 에러 [{error.code}] : {error.message}
          </pre>
          <Button variant="falcon-default" onClick={onClickHandler}>
            Retry
          </Button>
        </Flex>
      </Card>
    </div>
  );
}


  • setState 업데이트는 async 작업이다
    • 연속적으로 빠르게 도는 경우 모든 update를 보장할 수 없다
    • immer 의 produce 함수 안에서 필요한 내용을 만들어서 setState 한다→ Functional update form of the state setter


Bad Case

// 1. MLList 필터링 & 인덱스 찾기
const targetIdxList = checkedProductId.map((item) => {
  return productListData[productPackageIdx].MLList.findIndex((el) => el.productId === item);
});

// 2. 인덱스 맵 돌려서 값 변경
targetIdxList.forEach((itemIdx) => {
  if (itemIdx >= 0) {
    const nextState = produce(productListData, (draftState) => {
      draftState[productPackageIdx].MLList[itemIdx].plpSize = e.target.value;
    });
    setProductListData(nextState);
  }
});


화면

  • 타겟 idx 를 찾아서 for 문을 돌리지만, 맨 마지막 인덱스값만 “L” 로 변경이 되고, 이전 값들은 변경이 되지 않는다
  • BEFORE

  • AFTER


Good Case

  • 함수형으로 생성하여 update 한다
// Combine both updates into a single update
const combinedStateUpdate = produce(nextState, (draftState) => {
  // 1. MLList 필터링 & 인덱스 찾기
  const targetIdxList = checkedProductId.map((item) => {
    return draftState[productPackageIdx].MLList.findIndex((el) => el.productId === item);
  });
  // 2. 인덱스 맵 돌려서 값 변경
  targetIdxList.forEach((itemIdx) => {
    if (itemIdx >= 0) {
      draftState[productPackageIdx].MLList[itemIdx].plpSize = e.target.value;
    }
  });
});

setProductListData(combinedStateUpdate);

+ Recent posts