정리할 내용
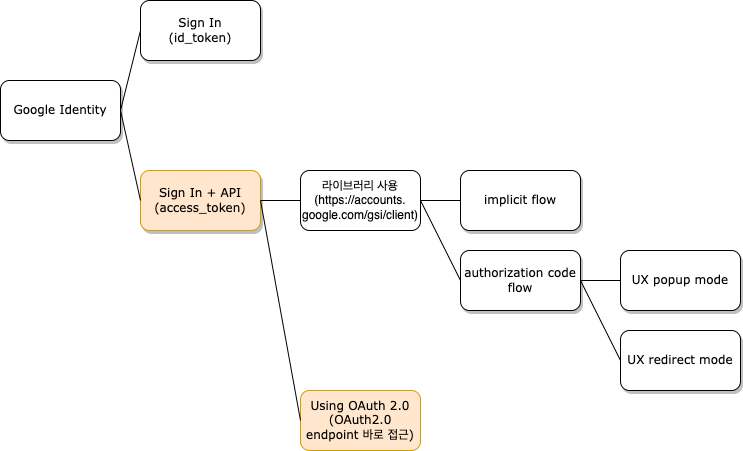
- Google Identity 간단 개념 (+ oauth) 👉 링크
- 구글 라이브러리에서 변경되는 내용 👉 링크
- authorization 에서 flow 선택 (gsi/client 라이브러리 사용)
- 라이브러리를 사용하지 않고 google oauth api로 direct 요청하기
- 토이플젝을 통해서 code → token 얻어내는 과정 및 유의사항
- 기존 로그인 플로우 & 변경되는 로그인 플로우 설명
Direct Using Google OAuth 2.0
- 다시 한 번 목적을 생각해보자
- 나는 access_token 과 refresh_token을 사용하여 “로그인”을 이용할 것이다
- refresh_token을 따로 관리해서 자동로그인 시켜주고 로그인이 거의 영원히 풀리지 않도록 하기 위해서
- 그리고 지금 라이브러리가 deprecated 되어서 새로운 라이브러리로 대체를 시켜줘야하는 상황
- 한가지 더 옵션이 있다
- 신규 라이브러리도 사용하지 않고 “Using OAuth 2.0” → google oauth api 로 direct 로 요청하는 방식 (링크)
- 로그인 flow using google oauth 2.0

- Using Google OAuth 2.0 전체 플로우를 front - server side 혼합하여 사용한다
- 목표는 access_token을 얻는 것
Step 1: Configure the client object
- If you are directly accessing the OAuth 2.0 endpoints, you can proceed to the next step.
- 라이브러리를 사용하는경우 client 객체를 init 해주어야 하지만, 다이렉트로 OAuth 2.0 엔드포인트에 접근하는 경우는 필요없다
Step 2: Redirect to Google's OAuth 2.0 server
- To request permission to access a user's data, redirect the user to Google's OAuth 2.0 server.
- 이제 직접 authorization(권한 부여) 를 요청한다
- 핵심
- oauth2Endpoint = "https://accounts.google.com/o/oauth2/v2/auth";
- 파라미터 값
- redirect_uri: "http://localhost:5000/direct-callback" -> google oauth 서버로 부터 code를 받을 곳 지정
- response_type: "code" -> token으로 요청하면 바로 access_token 을 준다
- scope: "email profile" -> 사용할 google api 범위, 이때 지정한 범위 안에서만 access_token으로 요청가능
- access_type: "offline" -> 이 값을 반드시 지정해야 authorization_code를 token으로 교환할 때 access_token과 함께 refresh_token 도 얻을 수 있다
- prompt: "consent" -> 이 값을 반드시 지정해야 authorization_code를 token으로 교환할 때 access_token과 함께 refresh_token 도 얻을 수 있다
- OAuth 에 GET 요청을 하기 위한 코드 구현방법은 두가지가 있다 (더 있을 수도) 둘 중에 마음에 드는것으로 선택하면 된다
[Option 1]
Oauth 문서에는 프론트에서 oauth 엔드포인트로 요청을 보낼 때 CORS를 허용하지 않아서 js로 동적으로 form을 만들어서 요청해야한다고, JS Sample을 아래와 같이 제공하고 있다
- direct.html
<!DOCTYPE html>
<html lang="en">
  <head>
    <meta charset="UTF-8" />
    <meta http-equiv="X-UA-Compatible" content="IE=edge" />
    <meta name="viewport" content="width=device-width, initial-scale=1.0" />
    <title>Document</title>
  </head>
  <body>
    <h1>Using Google OAuth 2.0</h1>
    <button onclick="oauthSignIn()">코드 요청</button>
    <script>
      /*
       * Create form to request access token from Google's OAuth 2.0 server.
       */
      function oauthSignIn() {
        var oauth2Endpoint = "https://accounts.google.com/o/oauth2/v2/auth";

        // Create <form> element to submit parameters to OAuth 2.0 endpoint.
        var form = document.createElement("form");
        form.setAttribute("method", "GET"); // Send as a GET request.
        form.setAttribute("action", oauth2Endpoint);

        // Parameters to pass to OAuth 2.0 endpoint.
        var params = {
          client_id:
            "YOUR_CLIENT_ID",
          redirect_uri: "http://localhost:5000/direct-callback",
          response_type: "code",
          scope: "email profile",
          access_type: "offline",
          prompt: "consent",
        };

        // Add form parameters as hidden input values.
        for (var p in params) {
          var input = document.createElement("input");
          input.setAttribute("type", "hidden");
          input.setAttribute("name", p);
          input.setAttribute("value", params[p]);
          form.appendChild(input);
        }

        // Add form to page and submit it to open the OAuth 2.0 endpoint.
        document.body.appendChild(form);
        form.submit();
      }
    </script>
  </body>
</html>
[Option 2]
window.location.href 를 통해서 url을 변경시켜주는 것또한 방법이다
<!DOCTYPE html>
<html lang="en">
  <head>
    <meta charset="UTF-8" />
    <meta http-equiv="X-UA-Compatible" content="IE=edge" />
    <meta name="viewport" content="width=device-width, initial-scale=1.0" />
    <title>Document</title>
  </head>
  <body>
    <h1>Using Google OAuth 2.0</h1>
    <button onclick="goToGoogleOAuth()">코드 요청</button>
    <script>
      function goToGoogleOAuth() {
        window.location.href = makeGoogleOauthUrl();
      }

      function makeGoogleOauthUrl() {
        var oauth2Endpoint = "https://accounts.google.com/o/oauth2/v2/auth";

        var params =
          "client_id=" +
          encodeURI(
            "YOUR_CLIENT_ID"
          ) +
          "&redirect_uri=" +
          encodeURI("http://localhost:5000/direct-callback") +
          "&response_type=" +
          encodeURI("code") +
          "&scope=" +
          encodeURI("email profile") +
          "&access_type=" +
          encodeURI("offline") +
          "&prompt=" +
          encodeURI("consent");

        return oauth2Endpoint + "?" + params;
      }

    </script>
  </body>
</html>
Step 3: Google prompts user for consent (생략) 👉 (링크)
Step 4: Handle the OAuth 2.0 server response
- 요청을 보내고 나면 redirect_uri: /direct-callback 으로 code 값을 받는다
- direct-callback.html 에서는 받은 param으로 받은 authorization_code를 localStorage에 저장하고, 다시 루트 (/direct) 로 페이지를 이동시킨다.
- direct-callback.html
<!DOCTYPE html>
<html lang="en">
  <head>
    <meta charset="UTF-8" />
    <meta http-equiv="X-UA-Compatible" content="IE=edge" />
    <meta name="viewport" content="width=device-width, initial-scale=1.0" />
    <title>Document</title>
  </head>
  <body>
    <script>
      const urlParams = new URL(location.href).searchParams;
      const code = urlParams.get("code");
      window.localStorage.setItem("authCode", code);
      window.location.href = "http://localhost:5000/direct";
    </script>
  </body>
</html>
- 다시 /direcct로 이동했을 때 로컬스토리지의 authCode 값을 확인하여, 백엔드 서버로 authCode를 보내주어야 한다.
- direct.html 안에 authCode 로컬 스토리지를 체크하는 코드가 필요하다. 아래 코드를 추가한다.
- 페이지 로딩시 바로 로컬 스토리지의 authCode를 체크하고, 값을 읽어서 백엔드 /locate API로 authCode를 전송한다
checkLocalStorage();
function checkLocalStorage() {
  const authCode = window.localStorage.getItem("authCode");
  if (authCode !== null) {
    // do server request
    fetch("<http://localhost:5000/locate>", {
      method: "POST",
      body: JSON.stringify({ code: authCode }),
      headers: new Headers({
        "Content-Type": "application/json",
      }),
    })
      .then((res) => res.json())
      .then((data) => {
        console.log(data);
        window.localStorage.setItem(
          "login_token",
          data.login_token
        );
        console.log("do login with login_token");
      });
  }
}
Step 5: Exchange for access_token with authorization_code
- 백엔드 코드 (app.js)
// direct & authorization code flow : get tokens with authorization_code
app.post("/locate", async function (req, res) {
  const options = {
    uri: "https://oauth2.googleapis.com/token",
    method: "POST",
    qs: {
      client_id:
        "YOUR_CLIENT_ID",
      client_secret: "YOUR_CLIENT_SECRET",
      code: req.body.code,
      grant_type: "authorization_code",
      redirect_uri: "http://localhost:5000/direct-callback",
    },
    headers: {
      "Content-Type": "application/x-www-form-urlencoded",
    },
  };
  let token;
  request.post(options, function (error, response, body) {
    token = JSON.parse(body);
    console.log('token', token)
  });
  res.status(200).json({ login_token: "hello" });
});- 프론트로부터 받은 authorization_code를 가지고 oauth2.google 서버에 요청한다
- redirect_uri 는 최초 요청했을 때 redirect_url 값과 동일하게 적어야한다
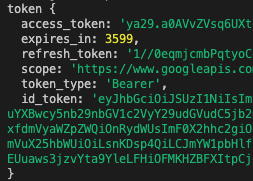
- 받은 token (access_token, refresh_token, id_token)을 통해 유저의 가입유무를 검증하거나, 별도 처리를 하고, 자체적으로 login_token을 만들어 프론트에 응답한다
- response
'programming > Web' 카테고리의 다른 글
| JWT 로 로그인 인증 구현하기 (0) | 2023.05.10 |
|---|---|
| AWS amplify 로 React 배포하기 (+ blank 빈 페이지 보이는 에러 잡기) (0) | 2023.04.20 |
| 구글 로그인 라이브러리 변경 - 2. 구글 로그인 라이브러리에서 변경되는 내용 (0) | 2023.01.22 |
| 구글 로그인 라이브러리 변경 - 3. authorization flow (gsi/client 라이브러리 사용) (0) | 2023.01.19 |
| 구글 로그인 라이브러리 변경 - 1. Google Identity OAuth 개념 (0) | 2023.01.18 |


