|| : OR 연산자 (MDN)

Logical OR 

논리 OR 계산용

둘 중 하나이상 참이면 👉 참


  • true || false ⇒ true
  • true || true ⇒ true
  • false || false ⇒ false


?? : null 병합 연산자 (MDN)

왼쪽이 null 또는 undefined 이면 오른쪽을 반환, 아니면 왼쪽값 사용


UseCase

form 의 default 값을 지정하려한다

store 에 저장해둔 값이 있다면 사용하고,

없다면 기본값을 수동으로 지정하려 한다.


[Incorrect]

 defaultValues: {
      setBillingAddressAsShippingAddress: paymentForm?.setBillingAddressAsShippingAddress || true,
      isManual: paymentForm?.isManual || false, 
      useOfTerms: paymentForm?.useOfTerms || false, 
      marketing: paymentForm?.marketing || false,
    },


위 처럼 작성한 경우 OR 논리 연산을 하게 된다. 

paymentForm.setBillingAddressAsShippingAddress 값이 false 인데, 뒤의 true 논리 연산에 의해 -> true 로 덮여짐


[Correct]

defaultValues: {
      setBillingAddressAsShippingAddress: paymentForm?.setBillingAddressAsShippingAddress ?? true, 
      isManual: paymentForm?.isManual ?? false,
      useOfTerms: paymentForm?.useOfTerms ?? false,
      marketing: paymentForm?.marketing ?? false,
    },


store 에 저장해둔 값이 있다면 사용하고(왼쪽값 리턴),

없다면 기본값을 수동으로 지정하려 한다(오른쪽 값 리턴).


세팅한 내용


[스트라이프 대시보드]

1. card 활성화

2. Apple pay 활성화

3. Payment domain 등록 

- 로컬 호스트 같은건 안됨, https 로 제공하는 도메인이어야 함,

- dev 서버가 https 로 돌고있어서, dev 도메인을 등록하였음

- verify 를 받기 위해선 아래 프론트에서 추가 작업이 필요함


[프론트 작업]

1. 스트라이프가 제공하는 도메인 인증용 파일을 다운로드 (참고)

2. Next.js 기준 /public/.well-known/apple-developer-merchantid-domain-association  파일 생성

3. 다운받은 도메인 인증용 파일 내용 붙여넣기

4. 미들웨어 설정에서 .well-known 으로 시작하는 라우팅은 미들웨어 로직 타지 않도록 설정

- middleware.ts

export const config = {
  // Matcher ignoring `/_next/` and `/api/`
  matcher: [
    "/", // Required when i18n is enabled, otherwise middleware won't be executed on index route
    "/((?!api/|google/|_next/|_static/|auth|_vercel|.well-known|fonts|icons|images/|[\\w-]+\\.\\w+).*)",
  ],
};


5. local-domain.com/.well-known/apple-developer-merchantid-domain-association 링크로 접근했을때, 해당 파일이 다운로드 됨

6. 다운로드 되지 않고, plain/text 로 제공하기 위해서 next.config.js 세팅

const nextConfig = {
  async headers() {
    return [
      {
        source: "/.well-known/apple-developer-merchantid-domain-association",
        headers: [
          {
            key: "Content-Type",
            value: "text/plain",
          },
        ],
      },
    ];
  },
  ...
}


7. dev 서버 배포

8. https://dev-mydomain.com/.well-known/apple-developer-merchantid-domain-association 로 접근시 텍스트 제공


[백엔드 설정]

* 사실 이 세팅을 왜 해줘야하는지 모르겠음..

* 백엔드에서 테스트를 직접 충분히 해볼 수 없어서 그냥 세팅 되어있는 대로 기재한다


1. intent 를 생성하는 로직에서 domain 을 등록 (참고)

// 백엔드 코드 로직
createPaymentIntent

1. customer create
2. setDomainName('https://dev-mydomain.com').build()
3. domain dreate
4. domain retrieve
5. domain setEnabled(true).build()
6. domain update


[기대값]

- 스트라이프가 알아서 판단해서 유저가 apple pay 사용 가능한 상태면 apple pay 를 노출 시켜준다고 한다.

- <PaymentElement> 내부 apple pay 탭 노출 됨


[문제상황]

1. apple pay 노출 안됨 

2. 1번을 해결하여 결제로 넘어갔을때 apple session 생성에서 에러 발생

{
  "error": {
    "message": "Could not create Apple Pay session. Please make sure you have registered this Stripe account. For more information, see https://stripe.com/docs/apple-pay#web.",
    "type": "invalid_request_error"
  }
}


[구글링...]

1. safari 개인정보보호 모드에서는 노출되고, 일반 모드에서는 애플페이 탭이 노출 안되었음.

- 비슷한 내용들의 질문글들이 있음.

- 사파리 세팅 값을 변경하니 (Check Apple Pay 를 disable 처리) 일반 모드에서도 애플페이 탭이 노출되었다

- 근데 애플페이 세팅이 잘 되어있는 사람한테도 Check Apple Pay 켜져있으면 애플페이 탭이 안 보이는게 이상하네(?)


https://github.com/woocommerce/woocommerce-gateway-stripe/issues/1548


Safari "Allow websites to check for Apple Pay" setting have to be disabled in order Apple Pay button appears. · Issue #1548 ·

Describe the bug See #1111. The issue is still there: p1619724791069000-slack-C7U3Y3VMY (see the thread for sample URLs) To Reproduce Use Safari with the setting enabled Open the sample URLs in pri...

github.com


https://wordpress.org/support/topic/apple-pay-not-displaying-when-safari-set-to-show/


Apple Pay not displaying when Safari set to show

Apple Pay not displaying when Safari set to show Resolved joolsf1 (@joolsf1) 2 years, 8 months ago I have a WooCommerce shop with Stripe Plugin. The Apple Pay button only displays on my desktop and…

wordpress.org


https://support.apple.com/en-al/guide/safari/ibrw1075/mac


Change Advanced settings in Safari on Mac

In Safari on your Mac, show full website addresses, set accessibility options, set advanced privacy options, and show features for web developers.

support.apple.com


[테스트 했던 세팅값들]

사파리 설정 켜짐 + 테스트 카드 애플페이 등록 : 일반 X, 시크릿 O

사파리 설정 켜짐 + 애플페이 없음 : 일반 X, 시크릿 O

사파리 설정 꺼짐 + 애플페이 없음 : 일반 O


2. apple session 생성에서 에러

사파리 세팅을 변경한 뒤 애플페이 탭이 잘 노출되고, 애플페이를 선택해서 결제로 넘어가면 session 을 생성하는 부분에서 에러가 발생한다.


URL: https://api.stripe.com/v1/apple_pay/session

status : 400

{
  "error": {
    "message": "Could not create Apple Pay session. Please make sure you have registered this Stripe account. For more information, see https://stripe.com/docs/apple-pay#web.",
    "type": "invalid_request_error"
  }
}


도메인도 등록하고 다 했는데, 왜 register 하라는 건가.. 도메인 관련된 에러가 맞는가..

비슷한 에러가 스택오버 플로우에 있는데, 명쾌한 답은 없고, 테스트 키라서 그런가 해서 라이브 키로 테스트 해보았다.

https://stackoverflow.com/questions/70809397/stripe-connect-enable-apple-pay


Stripe Connect – enable Apple Pay?

I'm trying to make Stripe Connect accounts accept payments in my app with the use of PaymentElement. So far the payments are going through with the regular credit card input, but now I want to enable

stackoverflow.com


라이브 키로 바꿔서 테스트 하니까.. 잘 됨


(머지?)


[(번외) 애플페이 테스트]

애플 테스트 카드 추가 방법

https://developer.apple.com/apple-pay/sandbox-testing/


Sandbox Testing - Apple Pay

The Apple Pay Sandbox environment allows merchants and developers to test their implementation of Apple Pay with test credit and debit cards.

developer.apple.com


1. 애플 개발자 센터에서 샌드박스 테스팅 계정 추가

2. 맥북 애플 id 테스트 계정으로 변경

3. 지갑에서 테스트 카드 등록

4. https dev 서버에서 스트라이프 라이브 키로 바꾸고 테스트 카드로 결제 진행하면, live 모드에서 왜 테스트 카드 쓰냐고 에러남


1. 현재 프로젝트 구성

Next.js App router 사용

Typescript

Eslint 


2. 테스트 툴 선택

Jest 와 Testing Library 를 사용하기로 결정


3. 세팅

1) Testing Libray React 패키지 설치

(참고 : Installation - With Typescript)

npm install --save-dev @testing-library/react @testing-library/dom @types/react @types/react-dom


2) Jest (React) 패키지 설치

(참고: Testing React Apps - Setup With Create React App)

npm install --save-dev jest react-test-renderer


(참고: Next.js JEST- Manual Setup)

npm install -D jest-environment-jsdom @testing-library/jest-dom


3) Typescript 용 추가 패키지 설치

npm i --save-dev @types/jest ts-jest


4) Eslint 용 추가 패키지 설치

npm i -D eslint-plugin-jest


5) 테스트 스크립트 추가

✅ 설치 후 package.json

"scripts": {
    "test": "jest"
},

"dependencies": {
    "react": "^18",
    "react-dom": "^18",
},

"devDependencies": {
    "@testing-library/dom": "^10.1.0",
    "@testing-library/jest-dom": "^6.4.6",
    "@testing-library/react": "^16.0.0",

    "@types/jest": "^29.5.12",
    "@types/react": "^18.3.3",
    "@types/react-dom": "^18.3.0",

    "jest": "^29.7.0",
    "jest-environment-jsdom": "^29.7.0",
    "react-test-renderer": "^18.3.1",

    "eslint-plugin-jest": "^28.6.0",

    "ts-jest": "^29.1.5",
}


6) tsconfig.json 에 types 추가

  "compilerOptions": {
    "types": ["node", "jest", "@testing-library/jest-dom"],


7) jest init 으로 기본 config 세팅

npm init jest@latest


✅ jset.config.ts 파일 확인

Next.js Jest config 사용하여 수정 (참고

/**
 * For a detailed explanation regarding each configuration property, visit:
 * https://jestjs.io/docs/configuration
 */

import type { Config } from "jest";
import nextJest from "next/jest.js";

const createJestConfig = nextJest({
  // Provide the path to your Next.js app to load next.config.js and .env files in your test environment
  dir: "./",
});

const config: Config = {
  // Automatically clear mock calls, instances, contexts and results before every test
  clearMocks: true,
 
  // An array of file extensions your modules use
  moduleFileExtensions: ["js", "mjs", "cjs", "jsx", "ts", "tsx", "json", "node"],

  // A preset that is used as a base for Jest's configuration
  preset: "ts-jest",

  // The test environment that will be used for testing
  testEnvironment: "jsdom",
};

export default createJestConfig(config);


8) .eslintrc.json에 설정 추가 (기존설정에 jest 관련 설정 추가)

"plugins": ["jsx-a11y", "@typescript-eslint", "prettier", "jest"],

"env": {
    // 전역객체를 eslint가 인식하는 구간
    "browser": true, // document나 window 인식되게 함
    "node": true,
    "es6": true,
    "jest/globals": true
},

"ignorePatterns": [
    "node_modules/",
    ".eslintrc.js",
    "next.config.js",
    "postcss.config.js",
    "run_server.js",
    "jest.config.ts"
], // eslint 미적용될 폴더나 파일 명시


4. 예제 코드 작성

(참고 - Jest Dom Testing)


Jest 페이지에서 제공하는 CheckboxWithLabel.js 컴포넌트를 만들고, 테스트 코드를 작성

typescript 버전으로 작성


1) CheckboxWithLabel.tsx

import { useState } from "react";

export default function CheckboxWithLabel({ labelOn, labelOff }: { labelOn: string; labelOff: string }) {
  const [isChecked, setIsChecked] = useState(false);

  const onChange = () => {
    setIsChecked(!isChecked);
  };

  return (
    <label>
      <input type="checkbox" checked={isChecked} onChange={onChange} />
      {isChecked ? labelOn : labelOff}
    </label>
  );
}


2) 프로젝트 루트에 __tests__/CheckboxWithLabel.test.tsx

import { cleanup, fireEvent, render } from "@testing-library/react";

import CheckboxWithLabel from "@/components/ui/CheckboxWithLabel";

// Note: running cleanup afterEach is done automatically for you in @testing-library/react@9.0.0 or higher
// unmount and cleanup DOM after the test is finished.
afterEach(cleanup);

it("CheckboxWithLabel changes the text after click", () => {
  const { queryByLabelText, getByLabelText } = render(<CheckboxWithLabel labelOn="On" labelOff="Off" />);

  expect(queryByLabelText(/off/i)).toBeTruthy();

  fireEvent.click(getByLabelText(/off/i));

  expect(queryByLabelText(/on/i)).toBeTruthy();
});


3) 테스트 실행

npm run test


5. 실제 내가 원하는 테스트 내용

  • url 로 다국가 처리중 : /{country}/{language} 👉 /kr/ko, /us/en, /ch/zh, /tw/zh, /jp/ja... 
  • 국가별로 지원하는 서비스가 다름 
    • kr : 주소로 배달, 매장 픽업
    • us : 주소로 배달, 매장 픽업
    • tw : 주소로 배달, 매장 픽업, 편의점 픽업
    • jp : 주소로 배달
  • next-intl 을 사용하여 다국어 처리를 하고 있음
    • /locales/ko/common.json 파일 안에 key-value 값으로 관리
  • <ShippingOptions> 라는 컴포넌트는 국가에 맞게, 필요한 버튼을 노출시켜주는 컴포넌트

TODO 👉 테스트 내용 : url 로 국가가 변경될 때마다 적절한 버튼들이 랜더링 되는가


1) ShippingOptions 컴포넌트 코드

import { useParams } from "next/navigation";
import { useEffect } from "react";

import { useCheckoutStore } from "@/shared/libs/stores/checkout";

import ConveniencePickup from "./_function/ConveniencePickup";
import ShipToAddress from "./_function/ShipToAddress";
import StorePickup from "./_function/StorePickup";

export default function ShippingOptions() {
  const { country } = useParams();

  const { updateShippingOption } = useCheckoutStore();

  useEffect(() => {
    if (!["kr", "us", "tw"].includes(country as string)) {
      updateShippingOption("shipToAddress");
    }
  }, [country]);

  if (["kr", "us"].includes(country as string))
    // 스토어 픽업 지원 국가
    return (
      <div className="flex gap-[8px] mb-[24px]">
        <ShipToAddress />
        <StorePickup />
      </div>
    );

  if (country === "tw")
    // 스토어 픽업 & 편의점 픽업 지원 국가
    return (
      <div className="flex gap-[8px] flex-col">
        <ShipToAddress />
        <StorePickup />
        <ConveniencePickup />
      </div>
    );
  return (
    <div className="mb-[24px]">
      <ShipToAddress />
    </div>
  );
}


2) /__tests__/ShippingOptions.test 테스트 코드

/* eslint-disable import/no-dynamic-require */
/* eslint-disable global-require */
import "@testing-library/jest-dom";
import { render } from "@testing-library/react";
import { useParams } from "next/navigation";
import { NextIntlProvider } from "next-intl";

import ShippingOptions from "@/components/pages/Checkout/ShippingStep/ShippingOptions";

// Mock useParams from next/navigation
jest.mock("next/navigation", () => ({
  useParams: jest.fn(),
}));

describe("ShippingOptions", () => {
  const useRouter = jest.spyOn(require("next/router"), "useRouter");
  const locale = "ko";
  const messages = require(`../locales/${locale}/common.json`);

  useRouter.mockImplementationOnce(() => ({
    query: { locale },
  }));

  it("kr 은 2가지 shipping option 을 리턴한다 (배송지 주소 / 매장에서 픽업)", () => {
    (useParams as jest.Mock).mockReturnValue({ country: "kr" });
    const { debug } = render(
      <NextIntlProvider messages={messages} locale={locale}>
        <ShippingOptions />
      </NextIntlProvider>,
    );

    // expect(getByText("배송지 주소")).toBeInTheDocument();
    // expect(getByText("매장에서 픽업")).toBeInTheDocument();
    debug();
  });

  it("jp 은 1가지 shipping option 을 리턴한다 (배송지 주소)", () => {
    (useParams as jest.Mock).mockReturnValue({ country: "jp" });
    const { getByText } = render(
      <NextIntlProvider messages={messages} locale={locale}>
        <ShippingOptions />
      </NextIntlProvider>,
    );

    expect(getByText("배송지 주소")).toBeInTheDocument();
  });

  it("tw 은 3가지 shipping option 을 리턴한다 (배송지 주소 / 매장에서 픽업 / 편의점에서 픽업)", () => {
    (useParams as jest.Mock).mockReturnValue({ country: "tw" });
    const { getByText } = render(
      <NextIntlProvider messages={messages} locale={locale}>
        <ShippingOptions />
      </NextIntlProvider>,
    );

    expect(getByText("배송지 주소")).toBeInTheDocument();
    expect(getByText("매장에서 픽업")).toBeInTheDocument();
    expect(getByText("편의점에서 픽업")).toBeInTheDocument();
  });
});


3) 테스트 실행

npm run test


4) 테스트 결과

debug() 를 사용하면, 실제 생성되는 html 을 확인 할 수 있다


[현상황]

jwt accessToken / refreshToken 을 사용하여 로그인 검증을 진행하고 있음

API 요청시 400 Bad Request 와 같은 응답은 response 로 잘 받아지고 있으나, 

accessToken 이 만료된 후, API 요청을 했을 때 401 Unauthorized 응답, 근데 response 에 접근하지 못하고 try-catch 에서 catch 에러로 빠지며, 스크립트로, status code, error message 에 접근하지 못함.

그냥 "failed to Fetch" 메시지로 찍힘


[기대상황]

API 요청시 400 / 401 모두 백엔드 서버에서 응답하는 response 객체로, HTTP status code 와 에러메시지로 접근하여 에러를 핸들링하고,

네트워크 레벨 에러, CORS 에러만 catch 에러로 핸들링하고자 함


Axios Instance 처럼 사용하고 있는 custom fetch Instance 

[코드]

import { getCookie } from "cookies-next";
import { signIn, getSession } from "next-auth/react";
import { CustomError } from "./customError";

interface FetchOptions extends RequestInit {
  headers?: HeadersInit;
}

let lastSession: any = null;

const fetchWithToken = async (
  url: string,
  method: string = "GET",
  body: any = null,
  options: FetchOptions = {},
): Promise<Response | undefined> => {
  // 현재 들고 있는 최근 세션 없는 경우만 session 요청
  if (lastSession == null) {
    const session = await getSession();
    if (session) {
      lastSession = session;
    } else {
      // 세션이 없는 경우 - 로그인 안한 상태
      // throw new CustomError("Unauthorized", 401);
    }
  }

  // 세션 정보 있는 경우 api 콜
  const headers = {
    ...options.headers,
    "Content-Type": "application/json",
    Country: getCookie("country") || "us",
    Language: getCookie("language") || "en",
    Authorization: `Bearer ${(lastSession?.user as any).accessToken}`,
  };

  const fetchOptions: FetchOptions = {
    ...options,
    method,
    headers,
    credentials: "include",
  };

  if (body) {
    fetchOptions.body = JSON.stringify(body);
  }

  try {
    const response = await fetch(`${process.env.NEXT_PUBLIC_CHAT_SERVER_API_URL}${url}`, fetchOptions);
    console.log("fetch response : ", response);
    return response;
  } catch (error) {
    // Promise 자체가 rejected (network error, CORS 등)
    console.log("fetch catch error : ", error);
    throw error;
  }
};

export { fetchWithToken };


백엔드로부터 정상 응답 (에러 응답도 포함 400, 401, 404, 등) 을 받는다면, fetch 의 response 에 접근할 수 있으나,


백엔드에서 정상 에러 응답 처리한 400 에러,

응답헤더에 CORS 처리가 잘 되어있다


프론트에서 fetch 의 response 로 받아서 console.log 에 response 가 status 코드와 함께 잘 찍힘


백엔드에 요청조차 하지 못하거나 (network level error),  CORS 처리가 되지 않은 응답을 받는다면, 바로 catch 에러 구문으로 떨어지게 된다.


크롬 개발자 툴에서 네트워크 탭을 확인해 보면, 401 Unauthorized 라고 백엔드로부터 정상적인 에러응답을 받은것 처럼 보인다.

여기서 헷갈리기 쉬웠던 것이 CORS 에러도 401 에러로 찍힌다.

응답헤더도 확인해보면 CORS 처리가 안되어 있는 것을 확인할 수 있다.


실제로 catch 구문으로 떨어져서, 프론트의 스크립트 상으로 status code와 error 메시지에 접근할 수 없고, 그저 fetch 자체에서 실패 처리한 "Failed to fetch" 메시지만 확인할 수 있다.


[해결책]

백엔드에서 실제 데이터 관련한 응답에서 에러응답을 리턴할때는 CORS 처리가 잘되어있었는데,

JWT 만료관련된 에러 응답을 리턴할 때는 CORS 처리가 안되어있는 것을 확인했다.

백엔드에서 응답헤더에 CORS 처리를 해주면 해결!


[포인트]

CORS 에러랑, 백엔드와 약속한 토큰만료시 리턴할 에러코드가 동일하게 401 이다.

이 때문에 CORS 에러 때문에 catch 에러로 떨어진 다는 것을 빠르게 캐치하지 못했다.


구현 조건

1. axios 대신 기본 fetch 를 사용

2. Authorization 에 accessToken 을 담아서 보내는 AuthFetch, 그냥 기본 fetch 인스턴스가 필요함

3. 로그인 후 받은 accessToken은 cookie 에 httpOnly 쿠키로 저장 -> js 단에서 가져다 쓸 수 없음

     - httpOnly 쿠키로 저장하지 않으면, next-cookie 의 getCookie() 등으로 자유롭게 가져다 쓸 수 있다.

4. next-auth의 useSession 을 통해서 accessToken 에 접근 가능

     - next-auth 의 useSession 을 통해서 접근할 수 있기 때문에 use** 형태의 훅 내부에 메서드를 사용하는 패턴으로 구현


단계별 구현


1. 기본 fetch 로 Client Side 데이터 fetch

  // 1. 기본 fetch
  useEffect(() => {
    fetch("https://api.coinpaprika.com/v1/coins")
      .then((res) => res.json())
      .then((data) => {
        console.log("data", data);
      });
  }, []);


2. 메서드의 재사용성을 위하여 hook 내부 method 로 구조 변경

1) useCheckout.ts 훅 생성

export const useCheckout = () => {
  
  const getCoins = () => fetch("https://api.coinpaprika.com/v1/coins").then((response) => response.json());

  return { getCoins };
};


2) 컴포넌트에서 메서드 호출

const { getCoins } = useCheckout();

// 2. useCheckout 내부 method 사용
useEffect(() => {
    getCoins().then((data) => {
      console.log("getCoins - data", data);
    });
}, []);


3. accessToken 를 헤더에 함께 보내는 AuthFetcher 사용


1) useFetchWithToken 훅 생성

import { useSession, signIn } from "next-auth/react";

interface FetchOptions extends RequestInit {
  headers?: HeadersInit;
}

export default function useFetchWithToken() {
  const { data: session, status } = useSession();

  const fetchWithToken = async (url: string, options: FetchOptions = {}): Promise<Response | undefined> => {
    if (status === "loading") {
      return;
    }
    if (status === "unauthenticated") {
      console.log("로그인이 필요합니다.");
      return;
    }

    const headers = {
      ...options.headers,
      "Content-Type": "application/json",
      Authorization: `Bearer ${(session?.user as any).accessToken}`,
    };

    try {
      const response = await fetch(`${process.env.NEXT_PUBLIC_CHAT_SERVER_API_URL}${url}`, {
        ...options,
        headers,
      });

      if (response.status === 401) {
        signIn();
      }

      return response;
    } catch (error) {
      console.error("Fetch error:", error);
      // Handle error accordingly
    }
  };

  return fetchWithToken;
}


2) useCheckout 훅에 method 추가 (fetchWithToken 을 사용하는 fetcher 메서드)

export const useCheckout = () => {
  const authFetcher = useFetchWithToken();

  const getCoins = () => fetch("https://api.coinpaprika.com/v1/coins").then((response) => response.json());

  const getAuthCoins = () => authFetcher("https://api.coinpaprika.com/v1/coins").then((response) => response.json());

  return { getCoins, getAuthCoins };
};


3) 컴포넌트 단에서 호출

  // 3. authFetcher 사용
  const { status } = useSession();
  useEffect(() => {
    getAuthCoins().then((data) => {
      console.log("getAuthCoins - data", data);
    });
  }, [status]);


4) 요청 헤더에 Authorization 확인 가능


4. react-query 사용하여 기본 fetch 호출

1번 로직에 react-query 추가

  // 4. useQuery 사용(기본 fetch)
  const { data } = useQuery({
    queryKey: ["test"],
    queryFn: () => fetch("https://api.coinpaprika.com/v1/coins").then((res) => res.json()),
  });
  useEffect(() => {
    console.log("useQuery - data", data);
  }, [data]);


5. react-query 에서 hook 내부 method 호출

2-1 에서 만들어 둔 getCoins 함수를 호출하여 사용

  // 5. useQuery 사용(useCheckout 내부 method 사용)
  const { data } = useQuery({
    queryKey: ["test"],
    queryFn: getCoins,
  });
  useEffect(() => {
    console.log("getCoins - data", data);
  }, [data]);


6. react-query 를 통해서 accessToken 를 헤더에 함께 보내는 AuthFetcher 사용

3-1 에서 만들어둔 useFetchWithToken 훅을 사용

useCheckout.ts

useFetchWithToken.ts 

동일하게 사용


컴포넌트 부분 코드 변경 -> useQuery 키값에 status 를 넣어서 세션의 status 값이 변경될때 재시도 될 수 있도록 함

// 6. useQuery 사용(authFetcher 사용)
  const { status } = useSession();
  const { data } = useQuery({
    queryKey: ["test2", status],
    queryFn: getAuthCoins,
  });

  useEffect(() => {
    console.log("getCoins - data", data);
  }, [data]);


<최종 모습>

1. MyComponent.tsx

import { useSession } from "next-auth/react";
import { useQuery } from "@tanstack/react-query";
import { useCheckout } from "@/shared/queries/checkout";


const { status } = useSession();
const { getAuthCoins } = useCheckout();
  
const { data } = useQuery({
    queryKey: ["test2", status],
    queryFn: getAuthCoins,
});

useEffect(() => {
	console.log("getCoins - data", data);
}, [data]);


2. useCheckout.ts

import useFetchWithToken from "@/hooks/useFetchWithToken";

export const useCheckout = () => {
  const authFetcher = useFetchWithToken();

  const getCoins = () => fetch("https://api.coinpaprika.com/v1/coins").then((response) => response.json());

  const getAuthCoins = () => authFetcher("/service/customers/niceid/oauth/token").then((response) => response.json());

  return { getCoins, getAuthCoins };
};


3. useFetchWithToken.ts

import { useSession, signIn } from "next-auth/react";

interface FetchOptions extends RequestInit {
  headers?: HeadersInit;
}

export default function useFetchWithToken() {
  const { data: session, status } = useSession();

  const fetchWithToken = async (url: string, options: FetchOptions = {}): Promise<Response | undefined> => {
    if (status === "loading") {
      return;
    }
    if (status === "unauthenticated") {
      console.log("로그인이 필요합니다.");
      return;
    }

    const headers = {
      ...options.headers,
      "Content-Type": "application/json",
      Authorization: `Bearer ${(session?.user as any).accessToken}`,
    };

    try {
      const response = await fetch(`${process.env.NEXT_PUBLIC_CHAT_SERVER_API_URL}${url}`, {
        ...options,
        headers,
      });

      if (response.status === 401) {
        signIn();
      }

      return response;
    } catch (error) {
      console.error("Fetch error:", error);
      // Handle error accordingly
    }
  };

  return fetchWithToken;
}

Next.js 프로젝트에서 http서버와 https 서버를 둘다 띄워서 사용하고 있는 상황


세팅 참고 : [Next.js] 로컬(localhost)에 https 적용하기


[Next.js] 로컬(localhost)에 https 적용하기

mkcert라는 프로그램을 이용해서 로컬 환경(내 컴퓨터)에서 신뢰할 수 있는 인증서 만들 수 있다.로컬(내 컴퓨터)을 인증된 발급 기관으로 추가(localhost로 대표되는) 로컬 환경에 대한 인증서를 만

velog.io


크롬에서 브라우저에서 2개의 탭을 열었음


http://localhost:3000


https://localhost:3001


처음에는 https 만 코드 fast refresh 가 적용이 되지 않는 줄 알았다

근데, 코드상에 차이점이 없어서 뭐지 삽질하면서 서버를 내렸다 올렸다, 브라우저를 리프레쉬했다 이랬다 저랬다 하는데, 이번에는 http 브라우저세션이 fast refresh 안됨


행동패턴을 살펴보니, 처음 서버를 올리고 건드린 브라우저에서는 fast refresh 가 되고, 다른건 안됨


=> Next.js 는 최초 사용되는 웹소켓 서버와 바인딩 함

  1. Single WebSocket Connection for HMR:
    • Next.js uses WebSocket connections for HMR to update the browser with changes in real-time.
    • Typically, the WebSocket server binds to a single address and port, usually the same as your HTTP server (e.g., http://localhost:3000).
  • When you run npm run dev, Next.js binds its WebSocket server for HMR to the address used first. If you refresh http://localhost:3000 first, the HMR WebSocket connection will be bound to the HTTP server.
  • Conversely, if you refresh https://localhost:3001 first after starting the server, the HMR WebSocket connection will be bound to the HTTPS server.


[참고 링크]

https://gseok.github.io/tech-talk-2022/2022-01-24-what-is-HMR/


HMR 이해하기

소개 보통 javascript 프로젝트 개발시에, 일반적으로 next.js와 같은 통합 개발 환경을 사용하거나, 직접 개발 환경을 구축 하더라도, webpack-dev-server의 hot 옵션정도를 사용하여서 개발을 하게 된다.

gseok.github.io


작업에 사용될 파일 구조


1. MSW 설치

npm i -D msw@1.3.2


[Usage] npx msw init <PUBLIC_DIR> [options]

npx msw init public


public 폴더 아래 mockServiceWorker.js 파일이 생성된 것을 확인

package.json 에 msw workinDirectory 세팅 된 것을 확인

"msw": {
    "workerDirectory": "public"
  }


2. MSW 구동 세팅

1. fake api/data 세팅

- api/mocks/fake-api/search-api.ts

import { rest } from "msw";

import { validData } from "../fake-data/search-data";

// GET method인 /get-names를 호출하면 다음과 같이 response가 되도록 mocking 정의
const getSearchProducts = () => rest.get("/get-names", (req, res, ctx) => res(ctx.status(200), ctx.json(validData)));

const searchHandlers = [getSearchProducts()];

export default searchHandlers;


- api/mocks/fake-data/search-data.ts

// 검색 결과 있는 경우
export const validData = {
  searchedProducts: [
    {
      id: 0,
      name: "test product 1",
      imgSrc: "test_img.png",
      price: 650,
      stockState: "Out of Stock",
    },
    {
      id: 1,
      name: "test product 2",
      imgSrc: "test_img.png",
      price: 650,
      stockState: "Out of Stock",
    },
    {
      id: 2,
      name: "test product 3",
      imgSrc: "test_img.png",
      price: 650,
      stockState: "Out of Stock",
    },
    {
      id: 3,
      name: "test product 4",
      imgSrc: "test_img.png",
      price: 650,
      stockState: "Out of Stock",
    },
  ],
};


2. 통합 handlers.ts 세팅

- api/mocks/handlers.ts

import searchHandlers from "./fake-api/search-api";

export const handlers = [...Object.values(searchHandlers)];


다른 fake-api 들도 추가되는대로 나열하여 작성


3. browser 에서 API mocking 실행 스크립트 작성

- api/mocks/browser.ts

import { setupWorker } from "msw";

import { handlers } from "./handlers";

export const worker = setupWorker(...handlers);


4. server 에서 API mocking 실행 스크립트 작성

- api/mocks/server.ts

import { setupServer } from "msw/node";

import { handlers } from "./handlers";

export const server = setupServer(...handlers);


5. 초기화 시점에 따라 brower / server 스크립트 실행 

- api/mocks/index.ts

export async function initMSW() {
  if (typeof window === "undefined") {
    const { server } = await import("./server");

    server.listen({
      onUnhandledRequest: "bypass",
    });
  } else {
    const { worker } = await import("./browser");
    worker.start({
      onUnhandledRequest: "bypass",
    });
  }
}


6. 클라이언트 단에서만 mocking 을 하기 위한 MswProvider 컴포넌트 작성

- components/provider/MswProvider.tsx

"use client";

import { useState, type PropsWithChildren, useEffect } from "react";

const isDev = process.env.NODE_ENV === "development";

interface Props {}

export default function MswProvider({ children }: PropsWithChildren<Props>) {
  const [ready, setReady] = useState(false);

  const init = async () => {
    if (isDev) {
      const initMock = await import("@/api/mocks/index");
      await initMock.initMSW();
      setReady(() => true);
    }
  };

  useEffect(() => {
    if (ready) return;
    init();
  }, [ready]);

  if (!isDev) return null;

  return <>{children}</>;
}


- .env 에 NODE_ENV 세팅

NODE_ENV=development


7.  루트 layout 에서 mocking 스크립트 실행

- app/layout.tsx

import MswProvider from "@/components/provider/MswProvider";

export default async function RootLayout({
  children,
  params,
}) {
  return (
    <html lang={lang}>
      <body className={fontClassName}>
        <MswProvider>
          <ReactQueryProvider>
            <NextIntlClientProvider locale={lang} messages={dict}>
              <Header />
              <div id="main-contents">{children}</div>
              <Footer lang={lang} />
            </NextIntlClientProvider>
          </ReactQueryProvider>
        </MswProvider>
      </body>
    </html>
  );
}


8. 실제 api 호출 테스트

- components/searchModal.tsx

  // 검색 API 호출
  const { isLoading, error, data } = useQuery({
    queryKey: ["search", inputValue],
    queryFn: () => getSearchProducts(inputValue),
    enabled: !!inputValue,
  });


- api/search.ts

// GET order summary 가져오기
export const getSearchProducts = async (query: string) => {
  const res = await fetch(`/get-names`);
  const json = await res.json();
  return json;
};


Network 탭에서 데이터 확인


mocking 할 데이터를 수정하는 경우에 브라우저 새로고침 해주어야 함!

  • aws s3 버킷에 에셋을 올리고 나서 url 을 리턴 받는데,
  • 비디오의 경우 일정 시간 동안 해당 url 이 not Found 를 리턴한다
  • 아마도 인코딩 시간동안은 접근이 안되는 것으로 추정(카카오 스토리지도 동일한 현상)
  • 해결방법으로 not Found 를 받는 경우 비디오 요소를 리랜더링 해서 해당 url 에 접근 재시도
    • 일정 주기 & 제한된 횟수 만큼


solution1)

  • 비디오 자체를 리랜더링
  • 내부 state 를 <video> 태그의 key 로 사용하여 리랜더링 될 수 있도록 한다
  • <video> 태그의 onError 속성 사용

component/VideoWithErrorCheck.tsx

import { useState } from "react";

export default function VideoWithErrorCheck({ ...props }) {
  const [errorCount, setErrorCount] = useState(0);
  const onVideoError = () => {
    // S3 URL 최초 몇 초 동안은 not Found 발생
    // 3초마다 1번씩 최대 10번만 시도
    if (errorCount < 10) {
      setTimeout(() => {
        setErrorCount((prevErrorCount) => prevErrorCount + 1);
      }, 3000);
    }
  };
  return <video key={errorCount} onError={onVideoError} {...props}></video>;
}


컴포넌트 사용부
myPage.tsx

<VideoWithErrorCheck
    width={"100%"}
    height={"100%"}
    style={{
      objectFit: "cover",
    }}
    src={`${el.mediaPath}`}
    controls
    autoPlay
    muted
    loop
/>


별건 아니고... 초창기에 흔히 하기 쉬운 실수..(?)


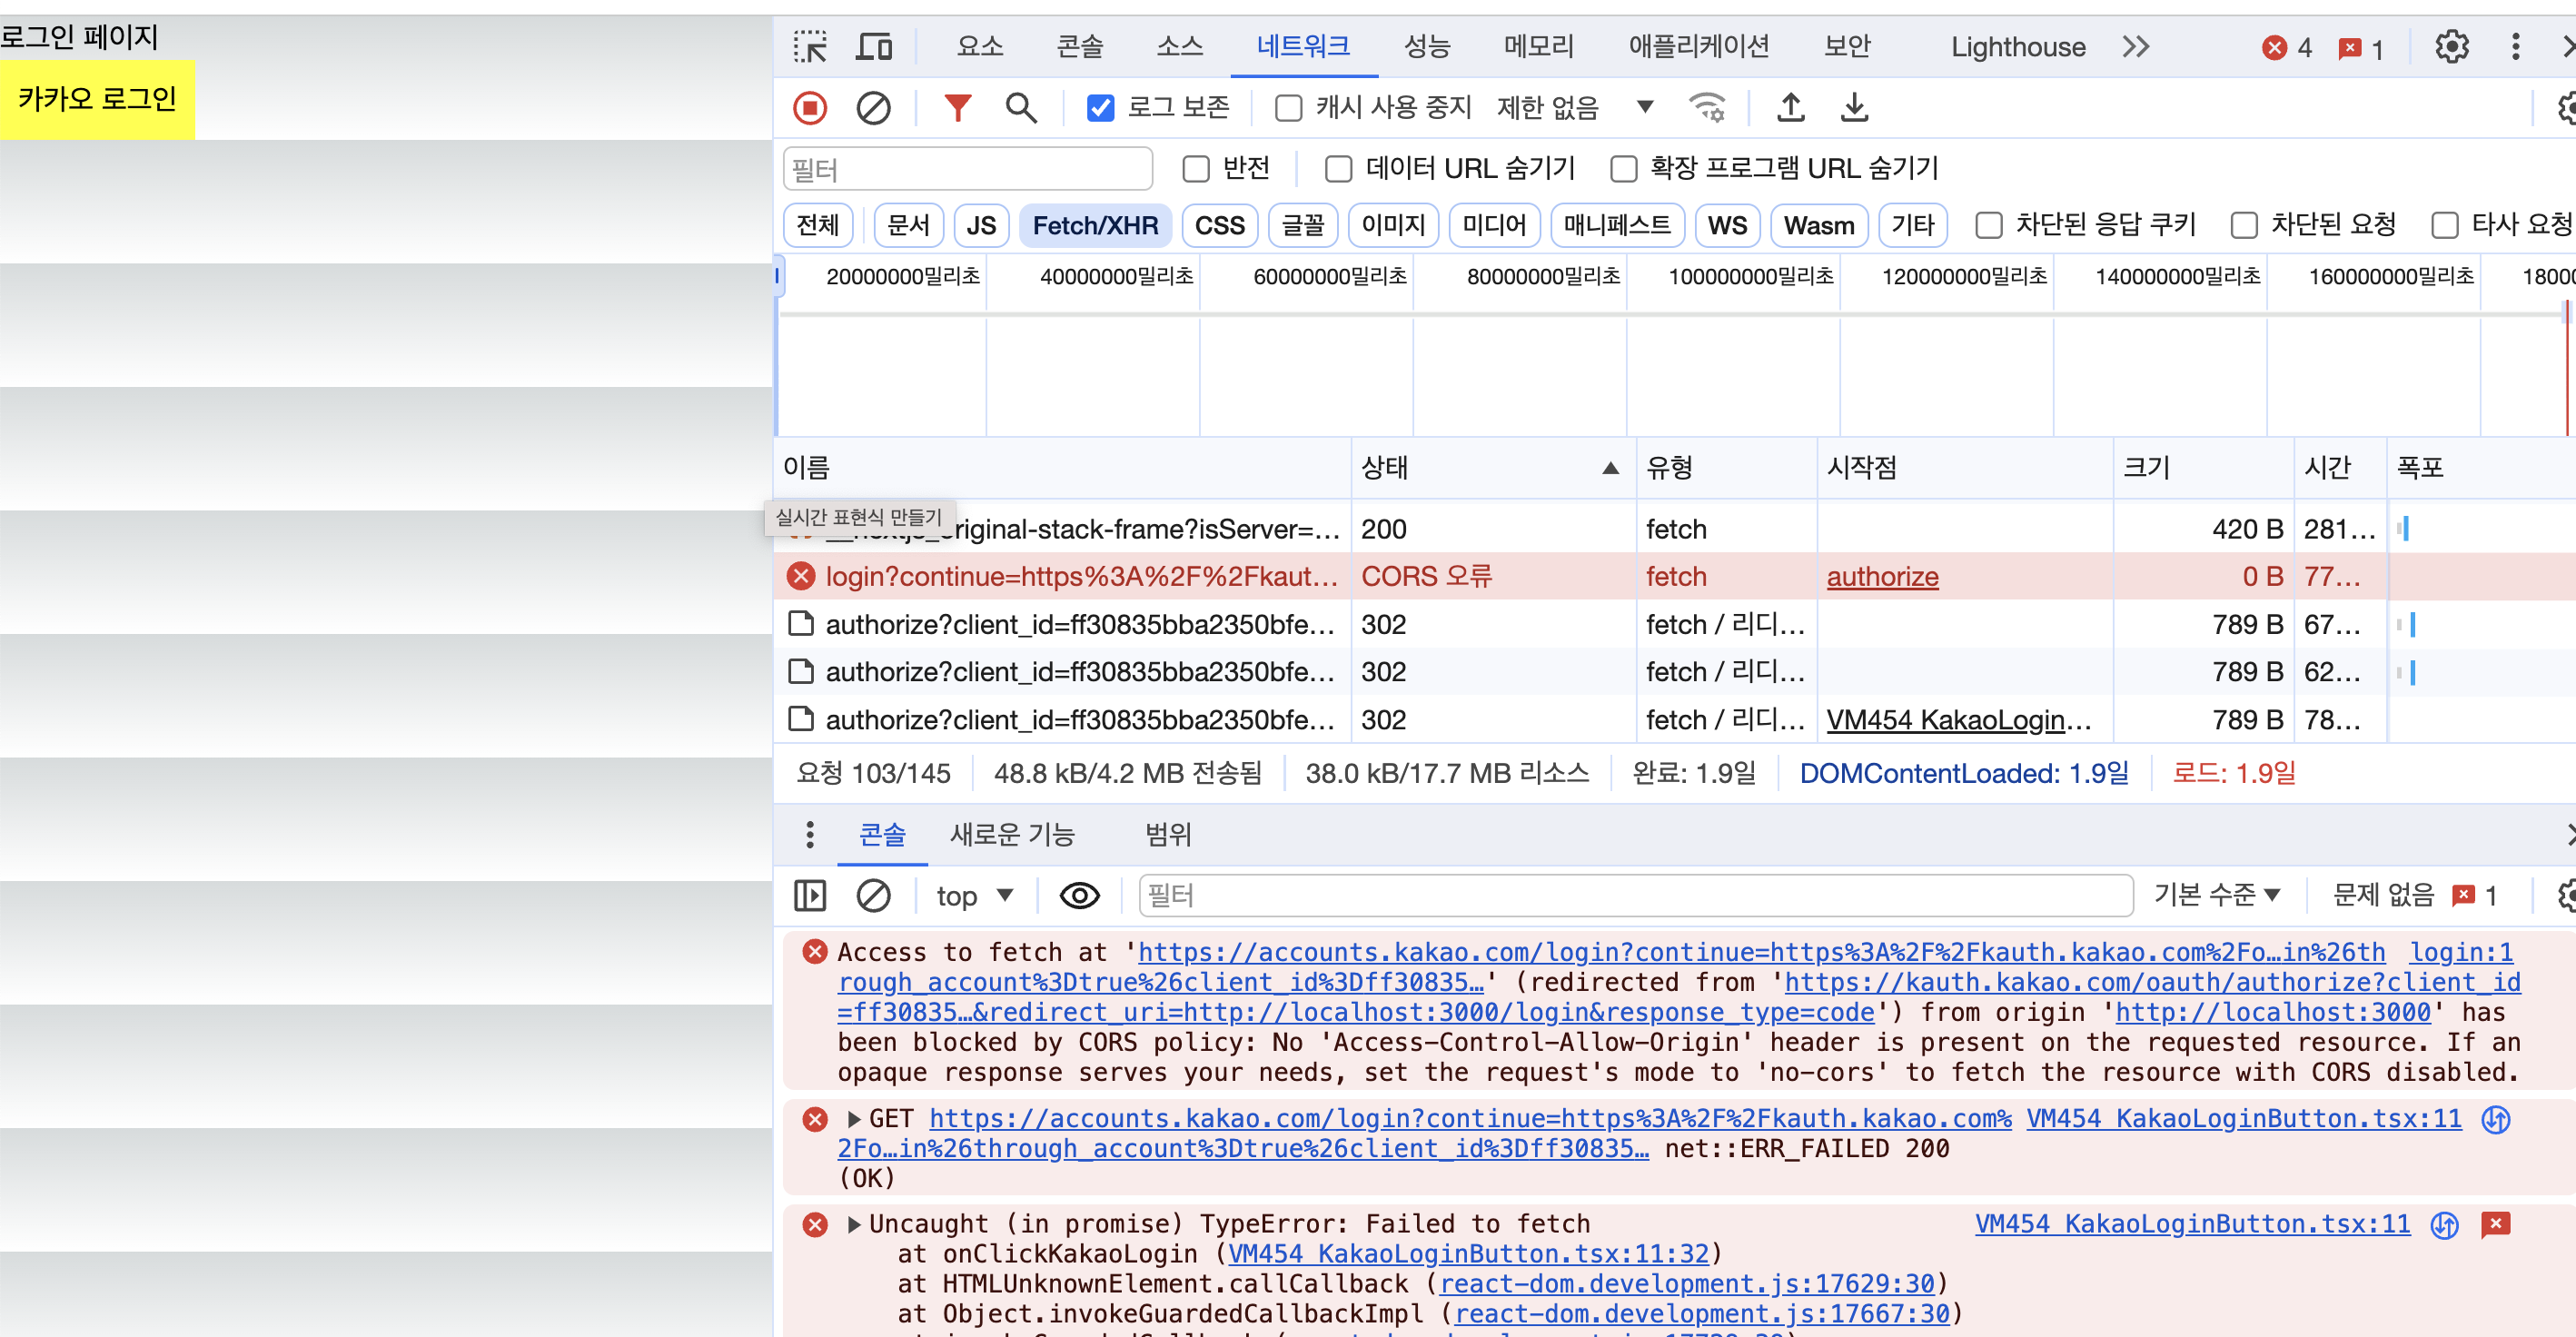
Access to fetch at 'https://accounts.kakao.com/login?continue=https%3A%2F%2Fkauth.kakao.com%2Foauth%2Fauthorize%3Fresponse_type%3Dcode%26redirect_uri%3Dhttp%253A%252F%252Flocalhost%253A3000%252Flogin%26through_account%3Dtrue%26client_id%3Dff30835bba2350bfe5fcf200c1eb4891' (redirected from 'https://kauth.kakao.com/oauth/authorize?client_id=ff30835bba2350bfe5fcf200c1eb4891&redirect_uri=http://localhost:3000/login&response_type=code') from origin 'http://localhost:3000' has been blocked by CORS policy: No 'Access-Control-Allow-Origin' header is present on the requested resource. If an opaque response serves your needs, set the request's mode to 'no-cors' to fetch the resource with CORS disabled.


로그인 요청 보낼 때 fetch 나 axios, ajax 비동기 요청함수로 보내면 CORS 에러난다


<a>, <Link> 로 리다이렉트 시켜야함


코드 요청부터 백엔드에서 다 한다고 해도, 백엔드로 요청하는 것부터 리다이렉트로 요청해야함


첫 시작은 url 로 get 요청


"use client";

import Link from "../../../node_modules/next/link";

export default function KakaoLoginButton() {
  return (
    <Link
      href={"http://localhost:5500/members/signin/kakao"}
      style={{ color: "black", backgroundColor: "yellow", padding: "10px" }}
    >
      카카오 로그인
    </Link>
  );
}


에러 케이스

에러가 발생하는 원인 관점에서 두가지 케이스가 있다.

1. 프론트 에러 : 주로 Type Error, 참조 에러 등

2. 백엔드 API 에러 : HTTP 케이스와 웹사이트 로직에 따라서 세부로 나뉨 (Get / Post / Put / Delete .. 등)


처리 방안

1. 프론트 에러

a) axios 요청 전부터 에러 발생 (accessToken 없음) 👉 토큰 없음 메시지 Toast UI 표출 & 로그인 페이지로 이동

b) 참조에러 👉 발생하는 컴포넌트를 ErrorBoundary 로 감싸고 fallBackComponent 처리 + Uncaught Error 메시지 제공


2. 백엔드 API 에러

a) GET 조회 결과 빈 데이터 👉 에러로 처리하지 않고, 200 성공에 데이터가 없는 경우 보여줄 컴포넌트로 처리

b) GET 조회 결과 에러 👉 에러 코드 & 메시지와 함께 Retry 버튼 제공

c) GET 조회 할 자원이 없는 데이터 👉 404 페이지

d) PUT, DELETE, POST 실패 👉 에러 코드 & 메시지 Toast UI 표출 및 요청 내용 처리 안함, 페이지 유지

e) 401 에러 👉 접근 권한 없음 문구 노출 & 로그인 페이지로 이동 버튼 제공

f) 404 에러 👉 404 페이지

g) 500 에러 👉 500 페이지


코드

(* ErrorBoundary 관련 케이스만)

    • 전체 구조


  • page/category.tsx
    • React-Query 의 useQueryErrorResetBoundary 를 사용하여 error 가 발생한 queryFn 을 재실행 트리거 할 수 있는 reset 함수 제공
export default function Category() {
	const { reset } = useQueryErrorResetBoundary();

	 return (
         <ErrorBoundary
            onReset={reset}
            fallbackRender={({ error, resetErrorBoundary }) => (
              <APIErrorFallback error={error} onClickHandler={resetErrorBoundary} />
            )}
          >
            <CategoryListTemplate/>
          </ErrorBoundary>
      )
  }


  • template/CategoryListTemplate.tsx
export default function CategoryListTemplate({
    const { isLoading, error, data, refetch } = useQuery({
        queryKey: ["category", "list"],
        queryFn: getCategoryList,
        useErrorBoundary: true,
      });

    if (isLoading) return <LoadingSpinner />;

    if (error) throw error; // error boundary 에서 처리

    return (
        <ErrorBoundary FallbackComponent={UncaughtErrorFallback}>
          <CategoryList data={categoryListData} />
        </ErrorBoundary>
    );
}


  • errors/UncaughtErrorFallback.tsx
import { Card } from "react-bootstrap";
import Flex from "../Flex";

export default function UncaughtErrorFallback({ error }) {
  return (
    <div role="alert">
      <Card className="mt-3 bg-light p-4" style={{ boxShadow: "none" }}>
        <Flex direction="column" alignItems="center">
          <h5 className="mb-2">오류가 발생했습니다.</h5>
          <div className="fs--1 mb-3">관리자에게 문의해주세요.</div>
          <pre className="text-danger">[Client 에러] : {error.message}</pre>
        </Flex>
      </Card>
    </div>
  );
}


  • errors/APIErrorFallback.tsx
import { Button, Card } from "react-bootstrap";
import Flex from "../Flex";

export default function APIErrorFallback({ error, onClickHandler }) {
  return (
    <div role="alert">
      <Card className="mt-3 bg-light p-5" style={{ boxShadow: "none" }}>
        <Flex direction="column" alignItems="center">
          <h5 className="mb-2">오류가 발생했습니다.</h5>
          <div className="fs--1">잠시 후 다시 시도해주세요.</div>
          <div className="fs--1 mb-2">동일한 문제가 반복될 경우 관리자에게 문의해주세요</div>
          <pre className="text-danger mb-4">
            API 요청 에러 [{error.code}] : {error.message}
          </pre>
          <Button variant="falcon-default" onClick={onClickHandler}>
            Retry
          </Button>
        </Flex>
      </Card>
    </div>
  );
}


+ Recent posts