최근 이미지 생성 워크플로우 자동화를 위해 ComfyUI를 로컬 환경에서 테스트해봤습니다.
이번 포스팅에서는 GPU를 사용하지 않는 모드로, MacBook Pro 16 (RAM 32GB) 환경에서 실행한 과정을 정리합니다.
1. 환경 및 사전 조건
- MacBook Pro 16 (32GB RAM)
- Docker 설치 및 실행 상태
- GPU 미사용 (CPU-only)
- Python 3.10-slim 기반 Docker 이미지 사용
2. Dockerfile 구성
GPU를 사용하지 않기 때문에 가벼운 Python 베이스 이미지를 선택했습니다.
# 가벼운 Python 베이스 이미지 사용
FROM python:3.10-slim

# OS 패키지 설치
# git, wget, libgomp1 외에 libgl1-mesa-glx, libglib2.0-0 패키지를 추가로 설치합니다.
RUN apt-get update && apt-get install -y git wget libgomp1 libgl1-mesa-glx libglib2.0-0


# ComfyUI 설치
RUN git clone https://github.com/comfyanonymous/ComfyUI.git
WORKDIR /ComfyUI

# Custom Nodes 미리 다운로드
RUN git clone https://github.com/chflame163/ComfyUI_LayerStyle.git custom_nodes/ComfyUI_LayerStyle
RUN git clone https://github.com/jags111/efficiency-nodes-comfyui.git custom_nodes/efficiency-nodes-comfyui
RUN git clone https://github.com/cubiq/ComfyUI_essentials.git custom_nodes/ComfyUI_essentials

# Custom Nodes 의존성 설치
# ComfyUI_LayerStyle의 의존성 설치
RUN pip install -r custom_nodes/ComfyUI_LayerStyle/requirements.txt
# efficiency-nodes-comfyui의 의존성 설치
RUN pip install -r custom_nodes/efficiency-nodes-comfyui/requirements.txt
# ComfyUI_essentials의 의존성 설치
RUN pip install -r custom_nodes/ComfyUI_essentials/requirements.txt

# CPU 전용 PyTorch 및 기타 라이브러리 설치
RUN pip install torch torchvision torchaudio --index-url https://download.pytorch.org/whl/cpu
RUN pip install -r requirements.txt

# ComfyUI 서버를 시작하는 명령어를 추가
CMD ["python", "main.py", "--listen", "0.0.0.0", "--cpu"]
📌 포인트
- GPU 의존성이 없으니 nvidia-docker 설정이 필요 없습니다.
- 필요한 커스텀 노드는 Dockerfile에서 바로 클론해두면 편합니다.
- 모델 로딩이 필요하다면 빌드 시 포함해야 합니다.
3. 실행 순서
1. Docker 이미지 빌드
docker build -t comfyui-local .
2. 컨테이너 실행
docker run -p 8188:8188 comfyui-local
3. 브라우저 접속
http://localhost:8188/
ComfyUI 화면이 뜨면 준비 완료!
이제 필요한 워크플로우를 로드하고 실행할 수 있습니다.
4. API 호출 테스트 (Postman)
Postman으로 API 호출 테스트했습니다.
ComfyUI는 이미지 업로드, 워크플로우 실행, 결과 조회를 모두 HTTP API로 지원합니다.
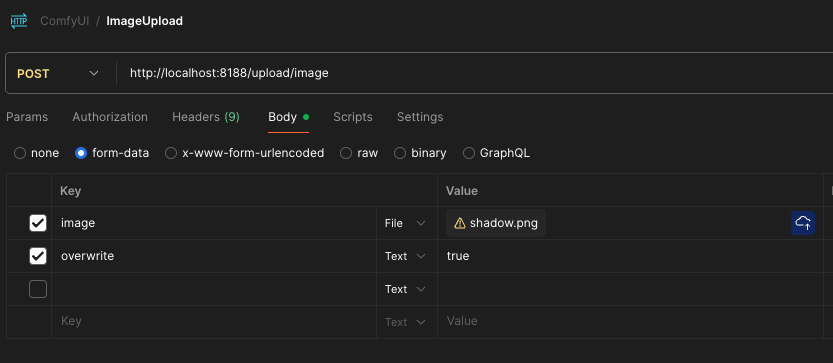
(1) 이미지 업로드
엔드포인트 : POST http://localhost:8188/upload/image
응답 예시
{
  "name": "shadow.png",
  "subfolder": "",
  "type": "input"
}
➡️ name과 subfolder 값은 다음 요청에서 사용됩니다.
(2) 워크플로우 실행
엔드포인트 : POST http://localhost:8188/prompt
Body (raw, JSON)
워크플로우를 API 형식으로 Export한 JSON 데이터를 prompt 키에 넣습니다.
{
  "prompt": { ... }
}
응답예시
{
  "prompt_id": "faa09324-4740-4b58-86f8-bfc45318607a",
  "number": 4,
  "node_errors": {}
}
➡️ prompt_id로 실행 상태와 결과를 조회합니다.

(3) 실행 결과 조회
엔드포인트 : GET http://localhost:8188/history/faa09324-4740-4b58-86f8-bfc45318607a
응답예시 (일부)
{
  "outputs": {
    "12": {
      "images": [
        {
          "filename": "ComfyUI_00003_.png",
          "subfolder": "",
          "type": "output"
        }
      ]
    }
  },
  "status": {
    "status_str": "success",
    "completed": true
  }
}
(4) 최종 결과 이미지 확인
출력 파일명을 사용해 브라우저로 직접 확인할 수 있습니다.
http://localhost:8188/view?filename=ComfyUI_00003_.png&type=output&subfolder=
5. 마무리
이번 테스트에서 느낀 점:
- Docker로 실행하면 환경 격리가 쉬워 관리가 편함
- API 연동을 통해 자동화 파이프라인 구성 가능
다만, 대규모 모델을 사용하거나 고해상도 이미지 작업은 CPU만으로는 시간이 오래 걸리니
본격적인 프로덕션 환경에서는 GPU 서버가 필요합니다.
'AI' 카테고리의 다른 글
| Runpod Serverless 로 ComfyUI 배포하기 (Pulid Faceswap 워크플로우 실행) (2) | 2025.08.27 |
|---|---|
| ComfyUI 에서 생성한 output 결과물 S3에 업로드하기 (0) | 2025.08.19 |
| [Error] ComfyUI 발생 에러 PulidFluxInsightFaceLoader (1) | 2025.08.11 |
| RunPod 서버리스와 네트워크 볼륨을 이용한 ComfyUI API 배포하기(Deploying ComfyUI as an API on RunPod Serverless with Network Volume) (6) | 2025.07.28 |
| [Tensorflow 자격증 공부] batch_size의 개념 (0) | 2022.01.09 |